Setting up a Playwright framework to test a web based app.
30 Apr 2026This post is an example of setting up a Playwright test framework for a web application. It assumes Playwright has already been installed and configured for Visual Studio Code (see previous blog post for a reminder).
Contents
- Introduction
- System Under Test
- Playwright Structure
- Playwright tools
- Running tests in a CI pipeline
- Summary
Introduction
As of 2026 Playwright has become increasingly in demand in the role of a Software Test Engineer- it’s now is rapidly closing the gap on other tools (source: ContextQA, “Playwright vs Selenium vs Cypress in 2026”, April 2026). If you’re new to Playwright or want to know more, the good news is in my experience it’s straightforward to install, and intuitive to start using.
This post takes it a step further in setting up a Playwright framework for a simple web app simple web app, demonstrates some of the key points around structure, using fixtures and pages for each test, api testing, managing test data and covers some of the powerful tools playwright has. This is by no means a full list of Playwright capabilities, but does give practical examples on how to go about structuring the Playwright framework, and links to the Playwright documentation where appropriate to provide more detail.
System Under Test
The system under test for this post is an application created which uses a sql backend, and spring boot to set up a web based front end, served by rest APIs. This was a straightforward architecture but is relevant in my experience to commercial projects- it’s possible to use any example project that follows this structure:
| Layer | Technology |
|---|---|
| Backend | Java + Spring Boot |
| API | REST (JSON endpoints via @RestController) |
| Data access | Spring Data JPA + SQLite (existing database, no migration needed) |
| Tests | Playwright (TypeScript or Java) |
| Front end | html |
Note: It’s feasible to use a test website like www.demoblaze.com which has APIs, a front end etc. but this project enables test data management, and a closer look at back end data.
Playwright Structure
Abstracting page objects and helpers
One of the fundamental aspects of Playwright is that it spins up a dedicated browser context for each test- so each test is ‘isolated’ from previous test runs, ensuring that cookies, storage, and state from one test never “leak” into the next. However, tests can (and should) reuse shared page objects using the page object model.
Using the page object model allows each web/application page to have it’s own class for locators, helpers etc. so multiple tests can re-use this page class. For example in this project, the Page Object Model ‘indexPage’ for the landing page contains all locators and helper functions relevant to the index page tests.
This approach can be used for other component objects (sidebars, footers etc.), and as we only have to update locators in one place is maintainable, and as the locators/helpers are abstracted to this page class the test class is a lot more readable- it only needs to focus on the logic of the test, the implementation is abstracted to the page class.
Example: in this integration test, the indexPage page is imported and the test can use the performSearch helper.:
test('search word not found, returns no results', async ({ indexPage }) => {

await indexPage.goto();

await indexPage.performSearch('green');

await expect(indexPage.noResultsMessage).toBeVisible();

await expect(indexPage.noResultsMessage).toHaveText('No books found.');
The indexPage page class contains the performSearch method:
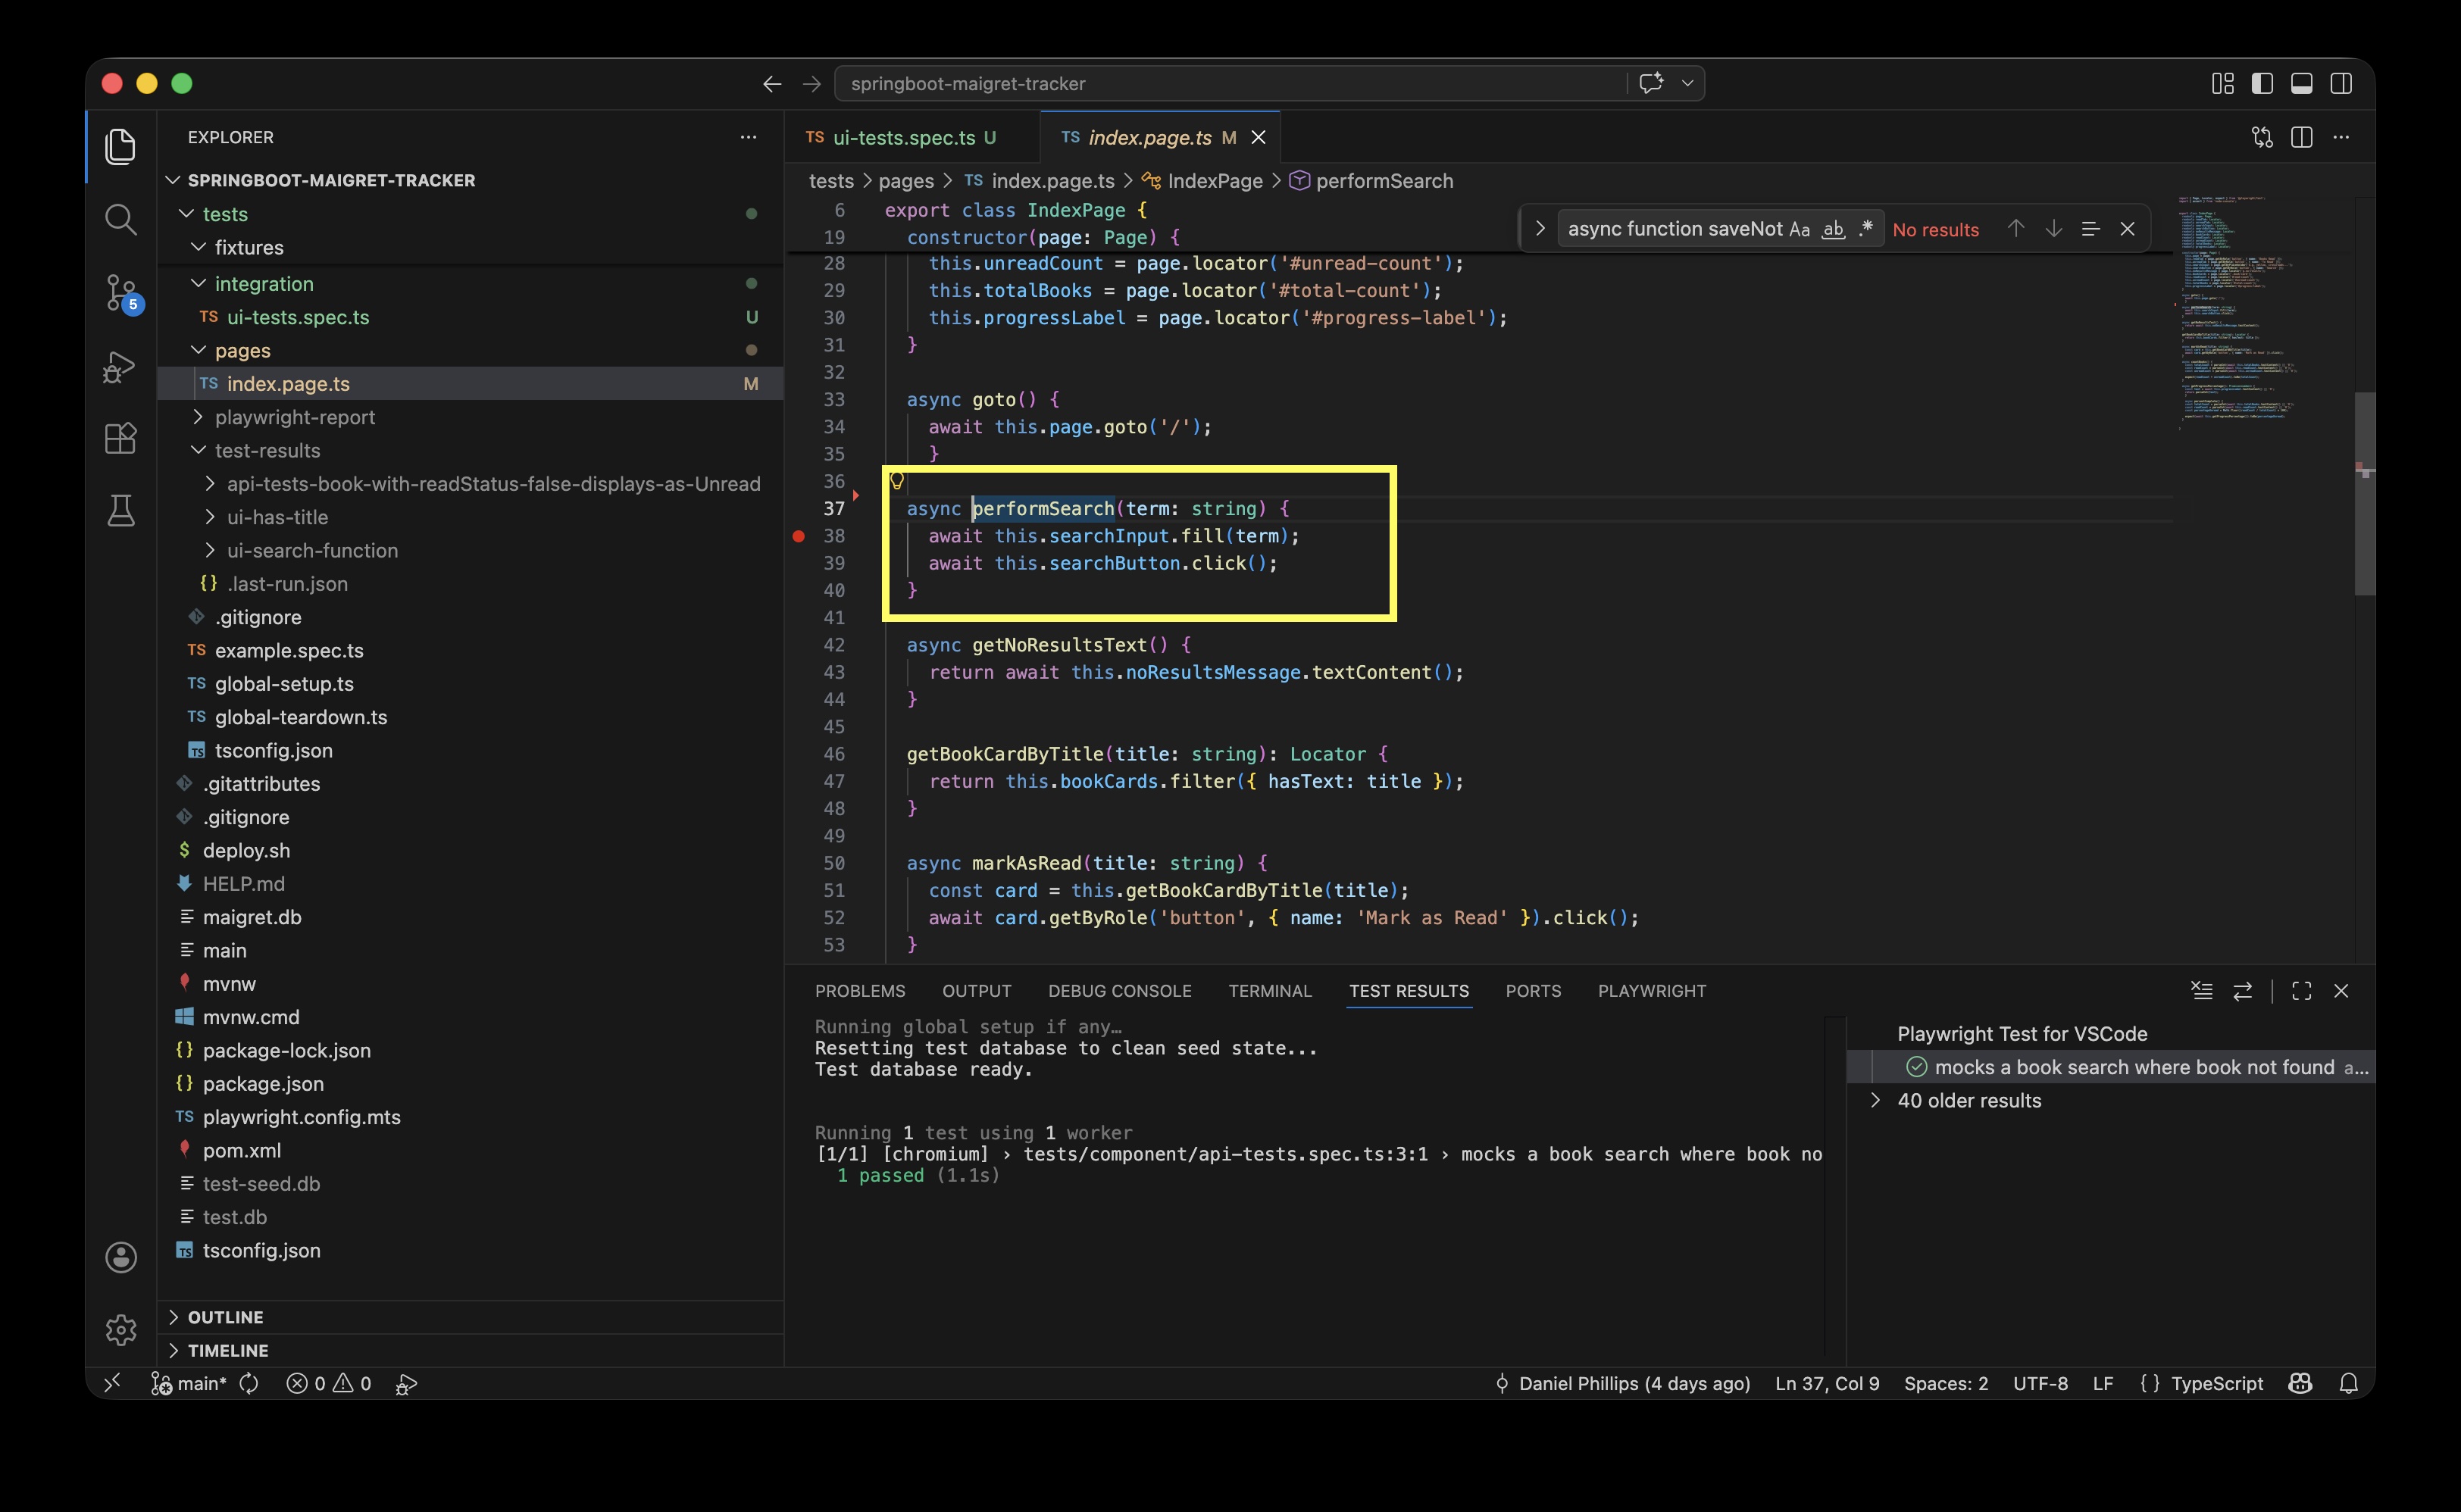
If the test didn’t use the page class and its helper, the functional code would have to be included in the test itself- it would work but would make the test harder to read (more lines of code), more effort to maintain, and the function would have to be repeated for any other test performing a search on the index page.
For more on page object model approach, see the helpful Playwright documentation.
Component versus Integration
The test folder for this project covers two different levels of testing- component and integration tests.
Integration tests — real Spring Boot + real SQLite
- Test the whole stack works together
- Need the test DB
- Slower, but proves end-to-end behaviour
Component tests — Playwright intercepts all API calls
- Test the frontend in isolation
- No backend needed (still needs the front end server running)
- Faster, great for edge cases
Note: By default Playwright (and other tools like Cypress) assume there is a third level at the top of the test pyramid, end to end (e2e). For this project given there are currently no actions such as auth log in, add/remove books the UI is effectively covered in the integration tests- but be aware you would usually see an e2e test level as well.
In integration tests we look at a straightforward example to see Playwright syntax, and also consider how to handle test data where an integration test does a write/update action. The project’s component tests includes tests which mock data, and we look at page.route().
Integration tests
Integration tests interact with the backend data and the front end ui, and are used to test the end-to-end process i.e. a button click initiates an api to fetch data, and the response is displayed on the front end.
For example the integration test search word not found, returns no results involves:
- inputting a search word in the ‘Search for a Book’ field e.g. ‘green’
- clicking search to trigger the url `http://localhost:8080/api/books/search?keyword=green
- There are currently no books in the books table with ‘green’ in the title, so the response returned is an empty array [] - front end displays “No books found.”
In the screenshot below clicking ‘Search’ where the search word is ‘green’ creates an API endpoint to read the books table, searching for the keyword green (../api/books/search?keyword=green):
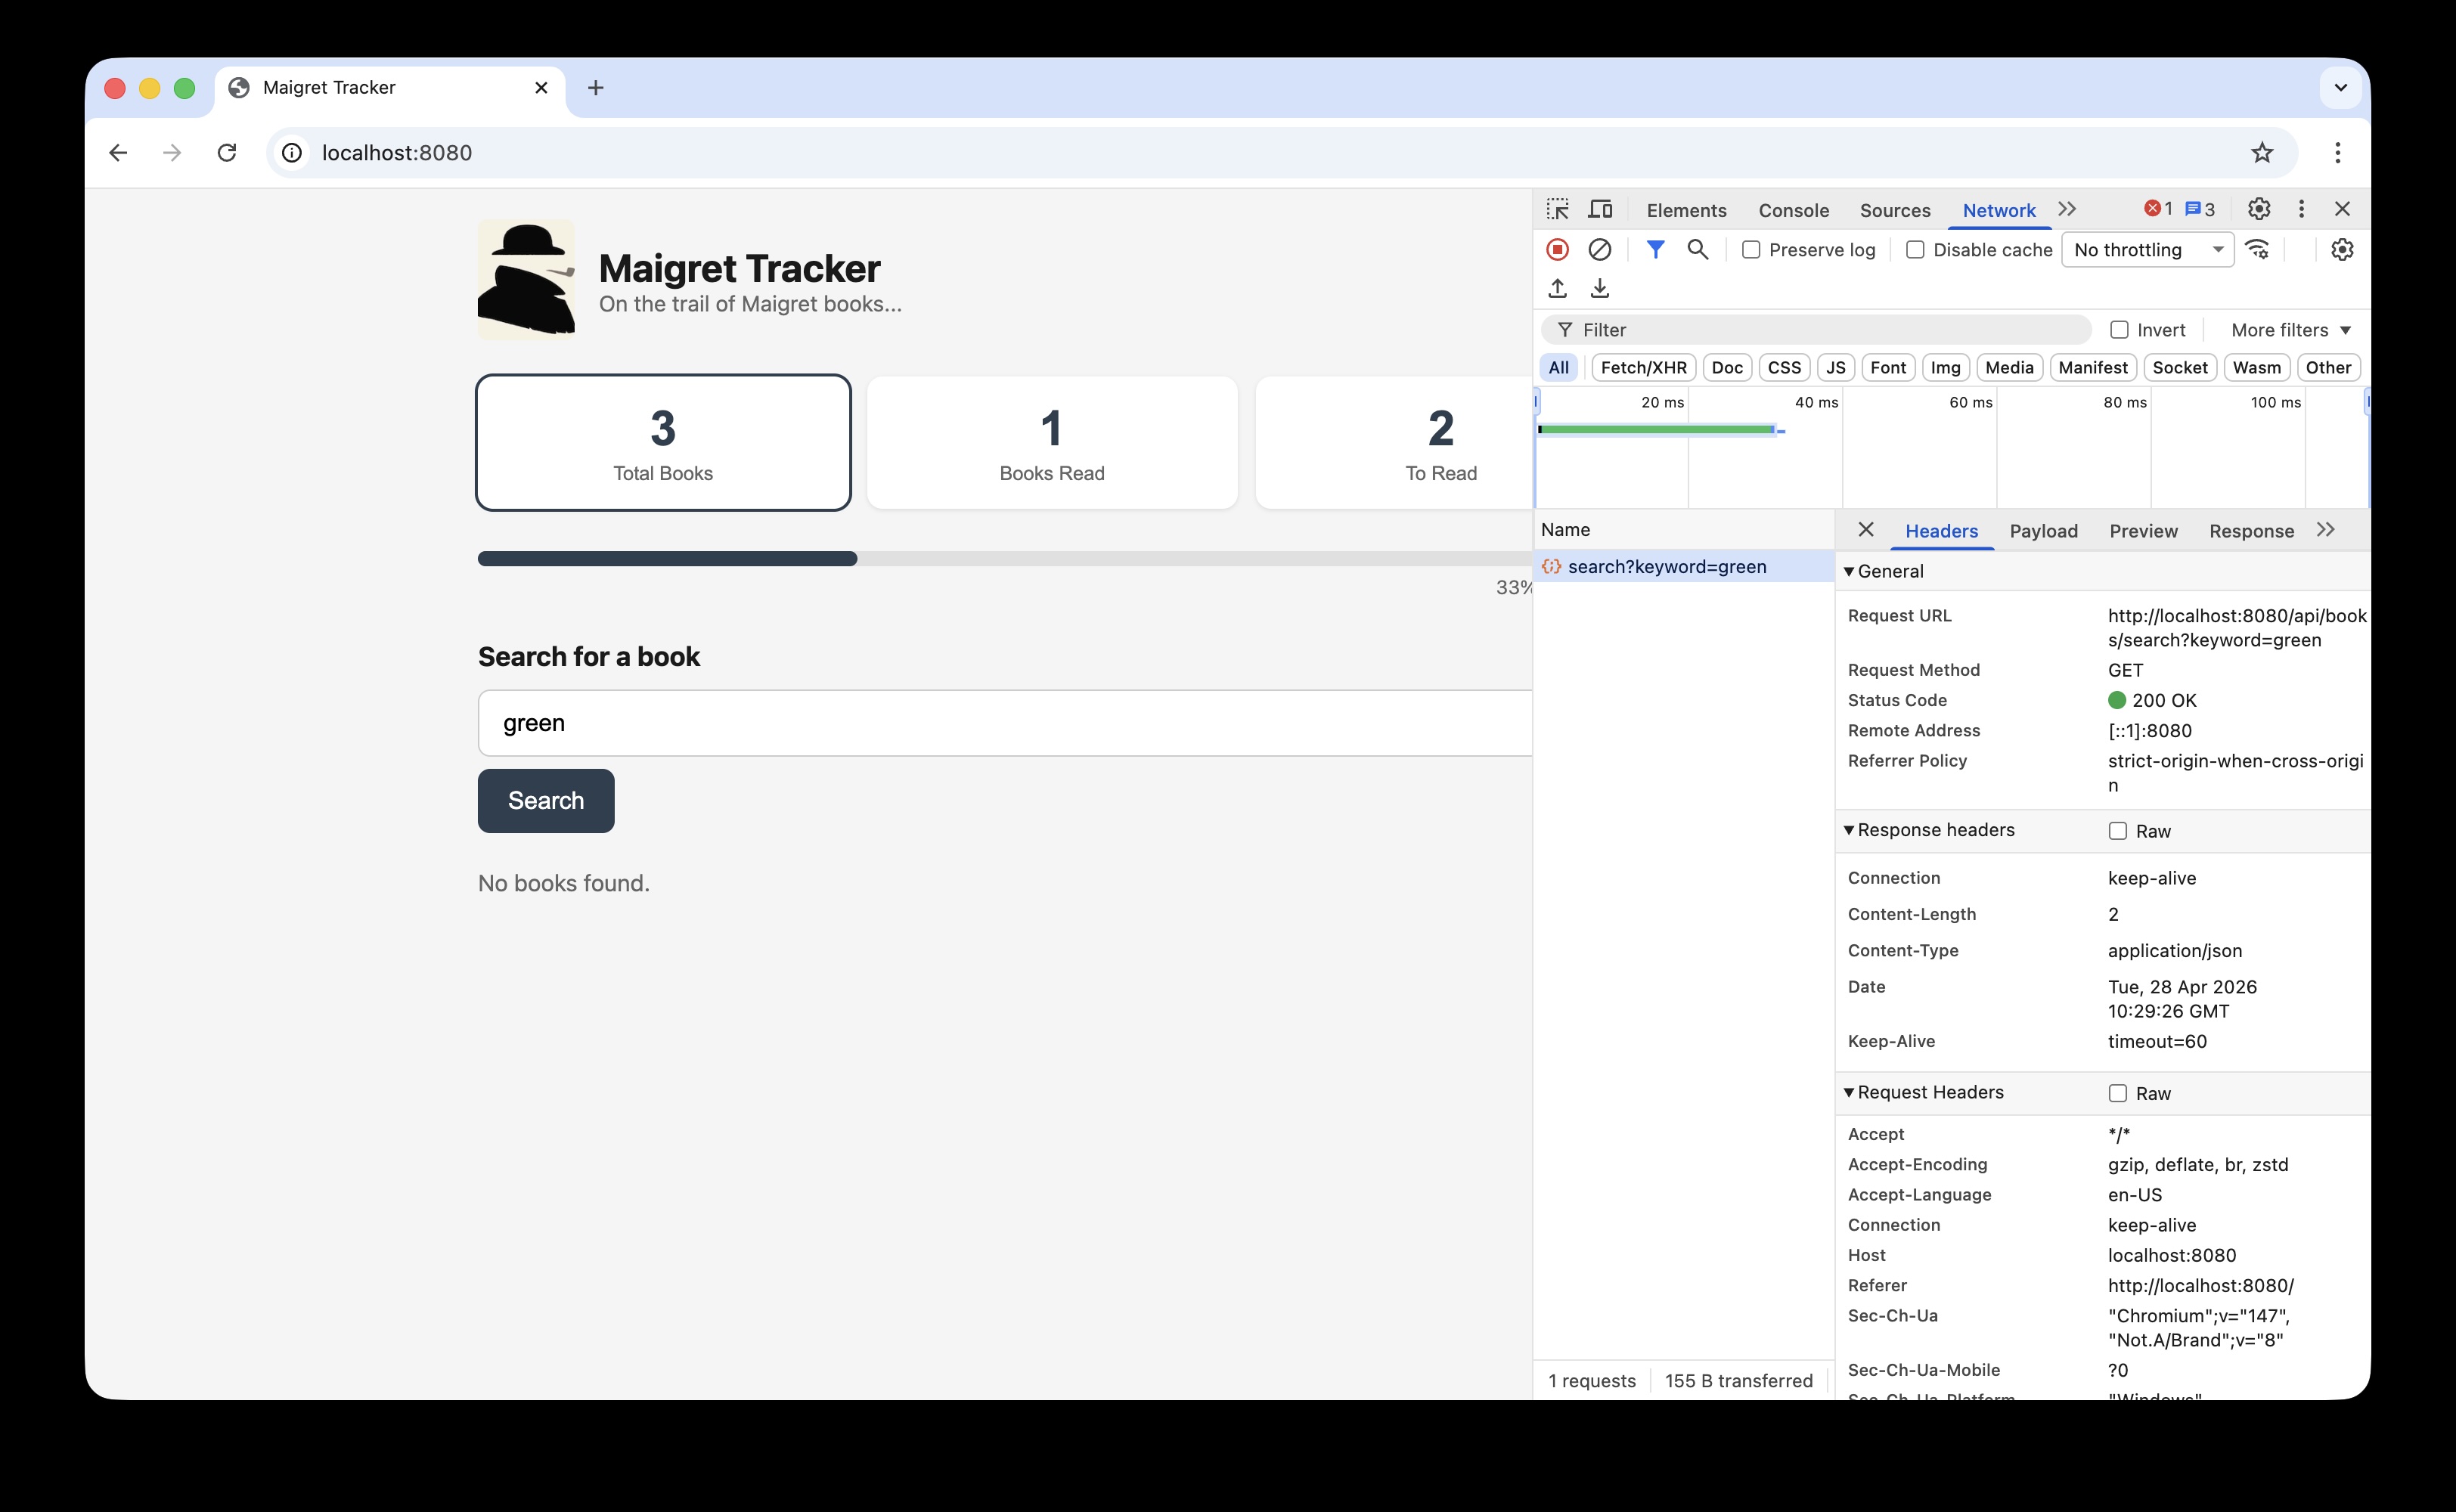
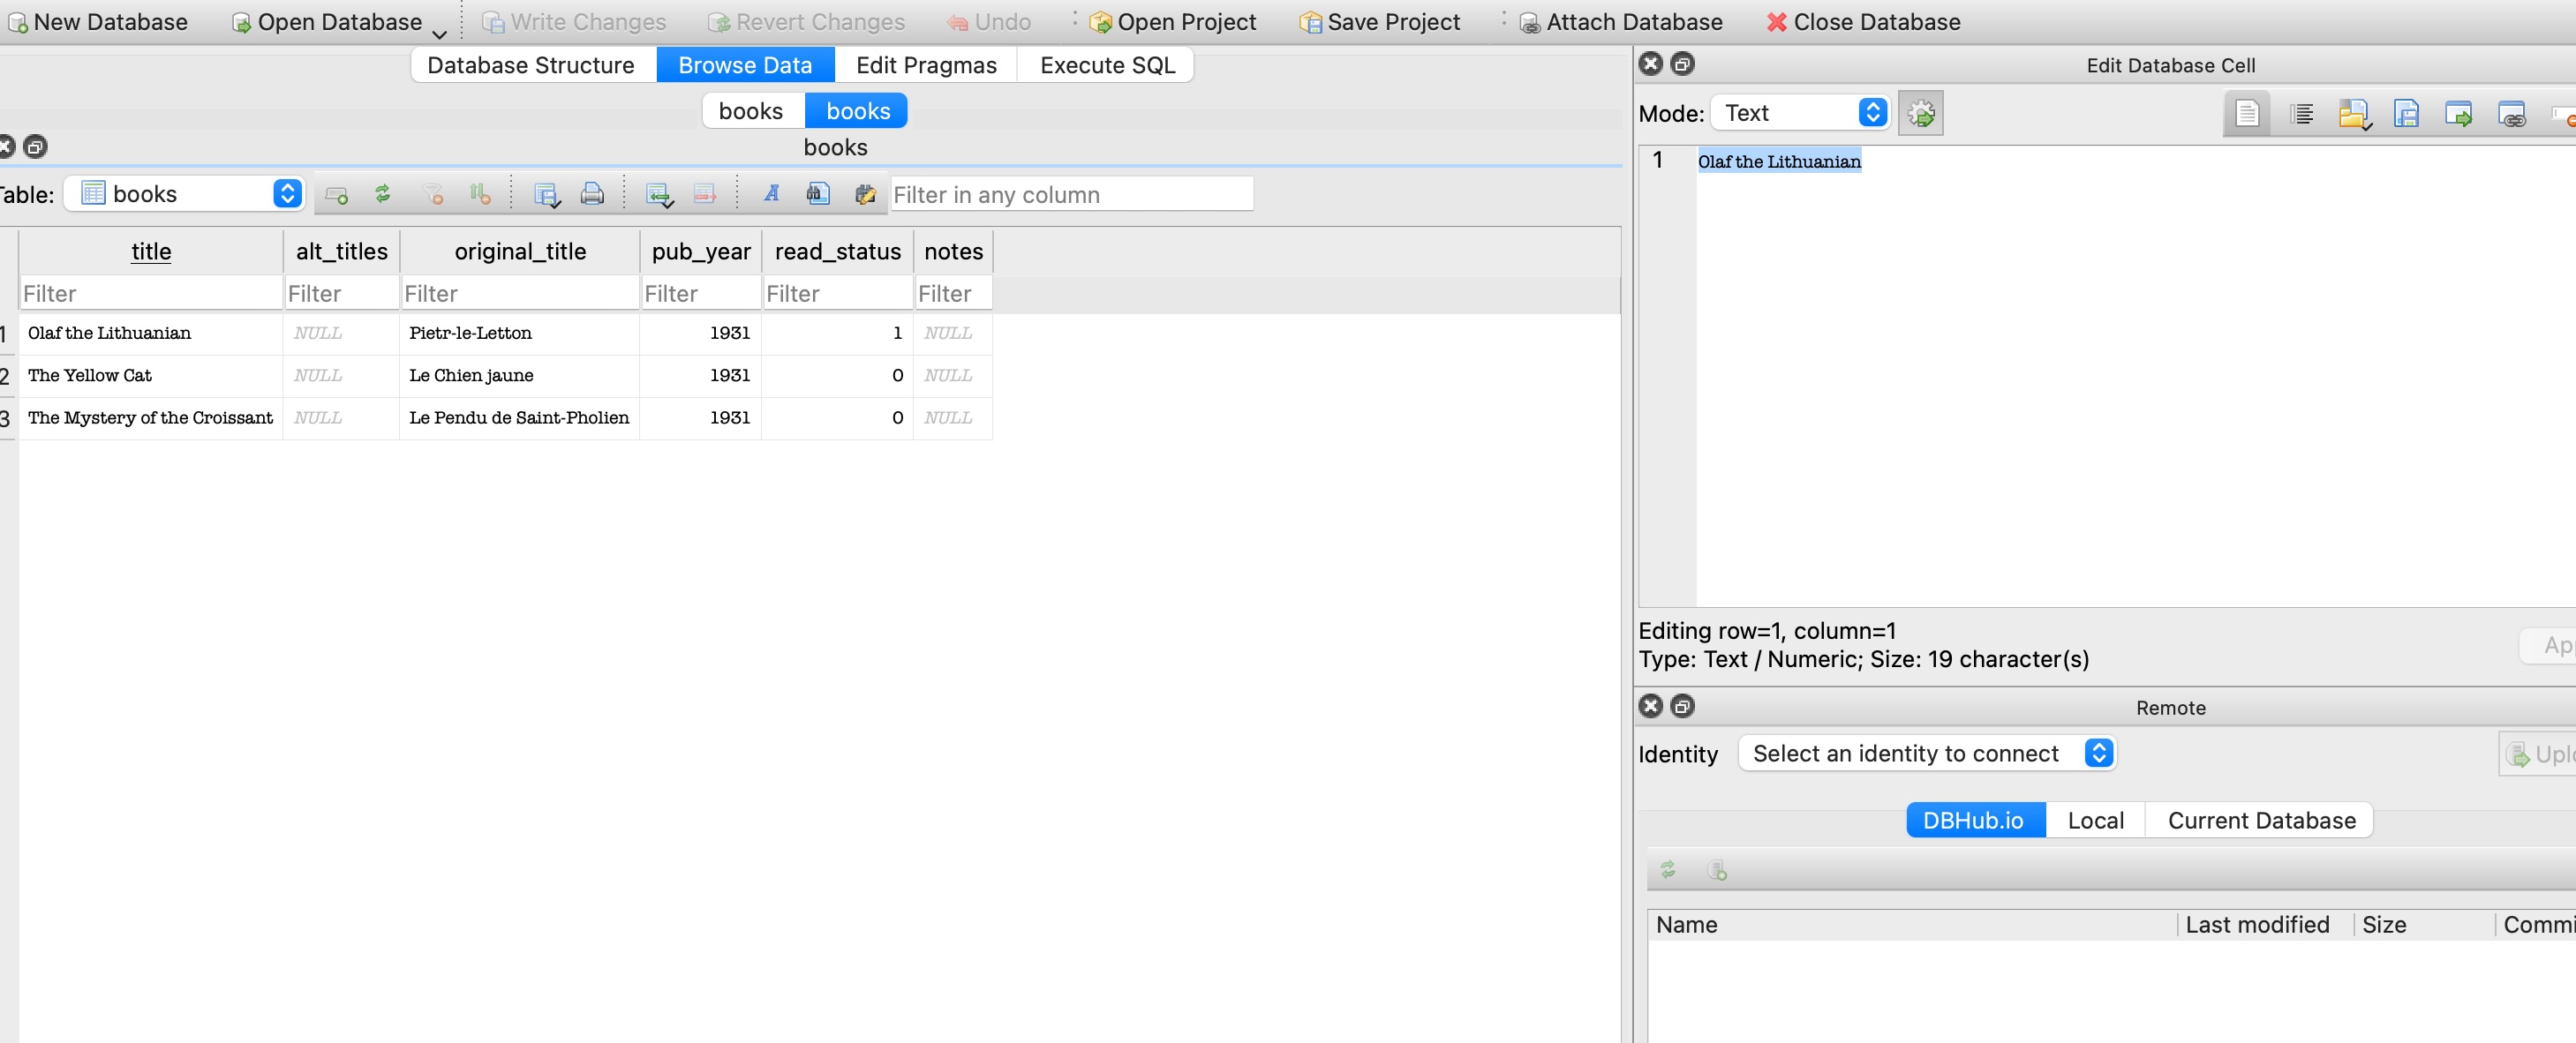
This api endpoint reaches the test books sql table, note are no books with ‘green’ in the table:
Managing test data
The previous integration test read the data in the database, but in the UI test class there is a test updating a book from unread to read that updates values:
test('updating a book from unread to read', async ({ indexPage}) => {
  await indexPage.goto();
  await indexPage.getBookCardByTitle("The Yellow Cat")
  await expect(indexPage.statusBadge('The Yellow Cat', 'unread')).toBeVisible();
  await indexPage.markAsRead('The Yellow Cat');
  await expect(indexPage.statusBadge('The Yellow Cat', 'read')).toBeVisible();
});
This test changes the status of a book to read, which then changes the number of read versus unread books on the index page. The integration test class has subsequent tests which verify the expected number of read books, which would then fail if this test changes that underlying data.
At this stage we need to consider how to manage test data. This is a challenge for all types of software testing, and while it’s not unique to Playwright its worth demonstrating one solution applied to enable effective integration testing in the Playwright framework.
In this project the solution adopted is to create a copy ‘test’ database using the same schema as the ‘production’ table, but populated with test data.
As integration tests are run against an instance of a test database, the test can create, read, update or delete data without compromising the original data. To clear down test data, we keep a test-seed.db table with the original test data, this is copied over test.db by the global setup class, the tests then run and read/write/delete test data, but the original data is reset by the global teardown class.
In other words before each test the @beforeAll action copies test-seed.db over the test.db, so each time the updating a book from unread to read test run it starts with the book in question in an unread state, updates it, then the @afterAll action resets that book record to ‘unread’.
test.beforeAll(() => {
  const seed = path.resolve(process.cwd(), 'test-seed.db');
  const target = path.resolve(process.cwd(), 'test.db');
  execSync(`cp ${seed} ${target}`);
});

test.afterAll(() => {
  const seed = path.resolve(process.cwd(), 'test-seed.db');
  const target = path.resolve(process.cwd(), 'test.db');
  execSync(`cp ${seed} ${target}`);
});
Mocking data for component tests
One of the required test cases is:
- Given I search for a book title which does not exist in the book database
- When I click ‘Search’
- Then I should see the book does not exist
This could be tested as an integration test, i.e. when the test clicks ‘Search’ the actual search api is invoked, and real data is read from the back end database. This works functionally, but given the test objective is purely the response generated when there are no search results, i.e. a discrete component rather than an integrated feature, it would be more efficient to mock the api response rather than make an api call to the backend.
As an example of this , the component test 'No books found' on screen when a book not found calls the same api endpoint http://localhost:8080/api/books/search?keyword=green, before looking at the test code its helpful to inspect the api.
Inspecting REST APIs with Swagger
In order to mock API responses, before we look at Playwright’s powerful page.route tools we need to understand the API layout and content.
Inspecting REST APIs with Swagger
We can check an API via Developer Tools → Network tab, but using Swagger lets us connect our REST APIs, view them in a list in a browser, and try them out. It's useful for this project as we can try out the books search API for the 'green' keyword to prove it returns no results before we write the test — without needing to run the app or trigger a real browser request. To install, add a dependency to pom.xml:<dependency>
<groupId>org.springdoc</groupId>
<artifactId>springdoc-openapi-starter-webmvc-ui</artifactId>
<version>2.3.0</version>
</dependency>Page.route()
Now that we have visibility and an understanding of the API used when searching for a book, the page.route method extends that to allow us to modify the network requests that are made when ‘Search’ is clicked. This allows us to mock the API response - i.e. when the api endpoint in the test is hit the test uses a mocked json response as the api response, rather than call the actual back end database.
Example
In the Swagger response we saw that the endpoint is http://localhost:8080/api/books/search?keyword=green. Given this is going to use mock data, we can drop the search word and intercept this path ‘/api/books/search’. This sets this api endpoint as the route object, we can apply the function action to return the mock json response, in the example below we want to return an empty array [] (to mock a search result with no books returned).
await page.route('**/api/books/search**', async route => {
await route.fulfill({
status: 200,
contentType: 'application/json',
body: JSON.stringify([])
});
	});
This simple example triggers the ‘No books found’ message without having to read the back end database to confirm no search results were found, and it ensures that even if many books to our test database, the search term for this specific test will always return the not found result- effectively just testing the not found response, not relying on data.
The other advantage of using mock data is that we can test for edge cases by setting json responses which would be awkward with real data, for example when the front end fails to fetch data from the table.
In the test below, rather than route.fulfill to return our mock json we can test what would happen if the api failed to connect to the back end data by using page.abort(). This aborts network request itself, so the json array for the books api does not load:
test('index page still renders even if books fail to load', async ({ indexPage, page, request }) => {

// Fetch real data first
const response = await request.get('http://localhost:8080/api/books');
const books = await response.json();

// Intercept and abort the loading of books
await page.route('**/api/books', route => route.abort());

//assert index page loads and 0 books have been loaded
await indexPage.goto();
await expect(indexPage.totalBooks).toHaveText('0');

});
Example Structure
The file tree below summarises the structure for this project, while there isn’t a set Playwright file structure this is a standard example of where the key folders and classes should sit:
Playwright tools
The scope and range of tools in Playwright is extensive, but these are some examples of tools that would address test scenarios in actual projects in my experience.
Visual Comparisons
While this current app is a basic html page, in a project with user stories related to formatting a web page, i.e. verifying font, layout, colour etc. Playwright’s Visual Comparison tool enables test coverage to include visual verification that the page rendered meets the agreed acceptance criteria.
Playwright is able to generate an initial baseline screenshot of the target screen, and refer back to the ‘golden expectation’ image to compare the the screen generated during the test to verify it is exactly the same. I’ve used this tool in the test below to simply verify the app’s landing page is unchanged (as the icon, object layout etc.)
test('visual comparison example test', async ({ indexPage, page }) => {

await indexPage.goto();

await expect(page).toHaveScreenshot();

});
The first time this test is run the baseline screenshot does not exist, and an error message appears:
🛑 Missing Snapshot Error A snapshot doesn’t exist at:
example.spec.ts-snapshots/example-test-1-chromium-darwin.png
This initial run saves the screenshot in a snapshots folder, and this is the ‘golden expectation’ future test runs will use to compare the browser window snapshot:
 Now when visual comparison example test runs, it goes to the landing (index) page, and verifies the screen is exactly as per visual-comparison image in the
 snapshots folder.
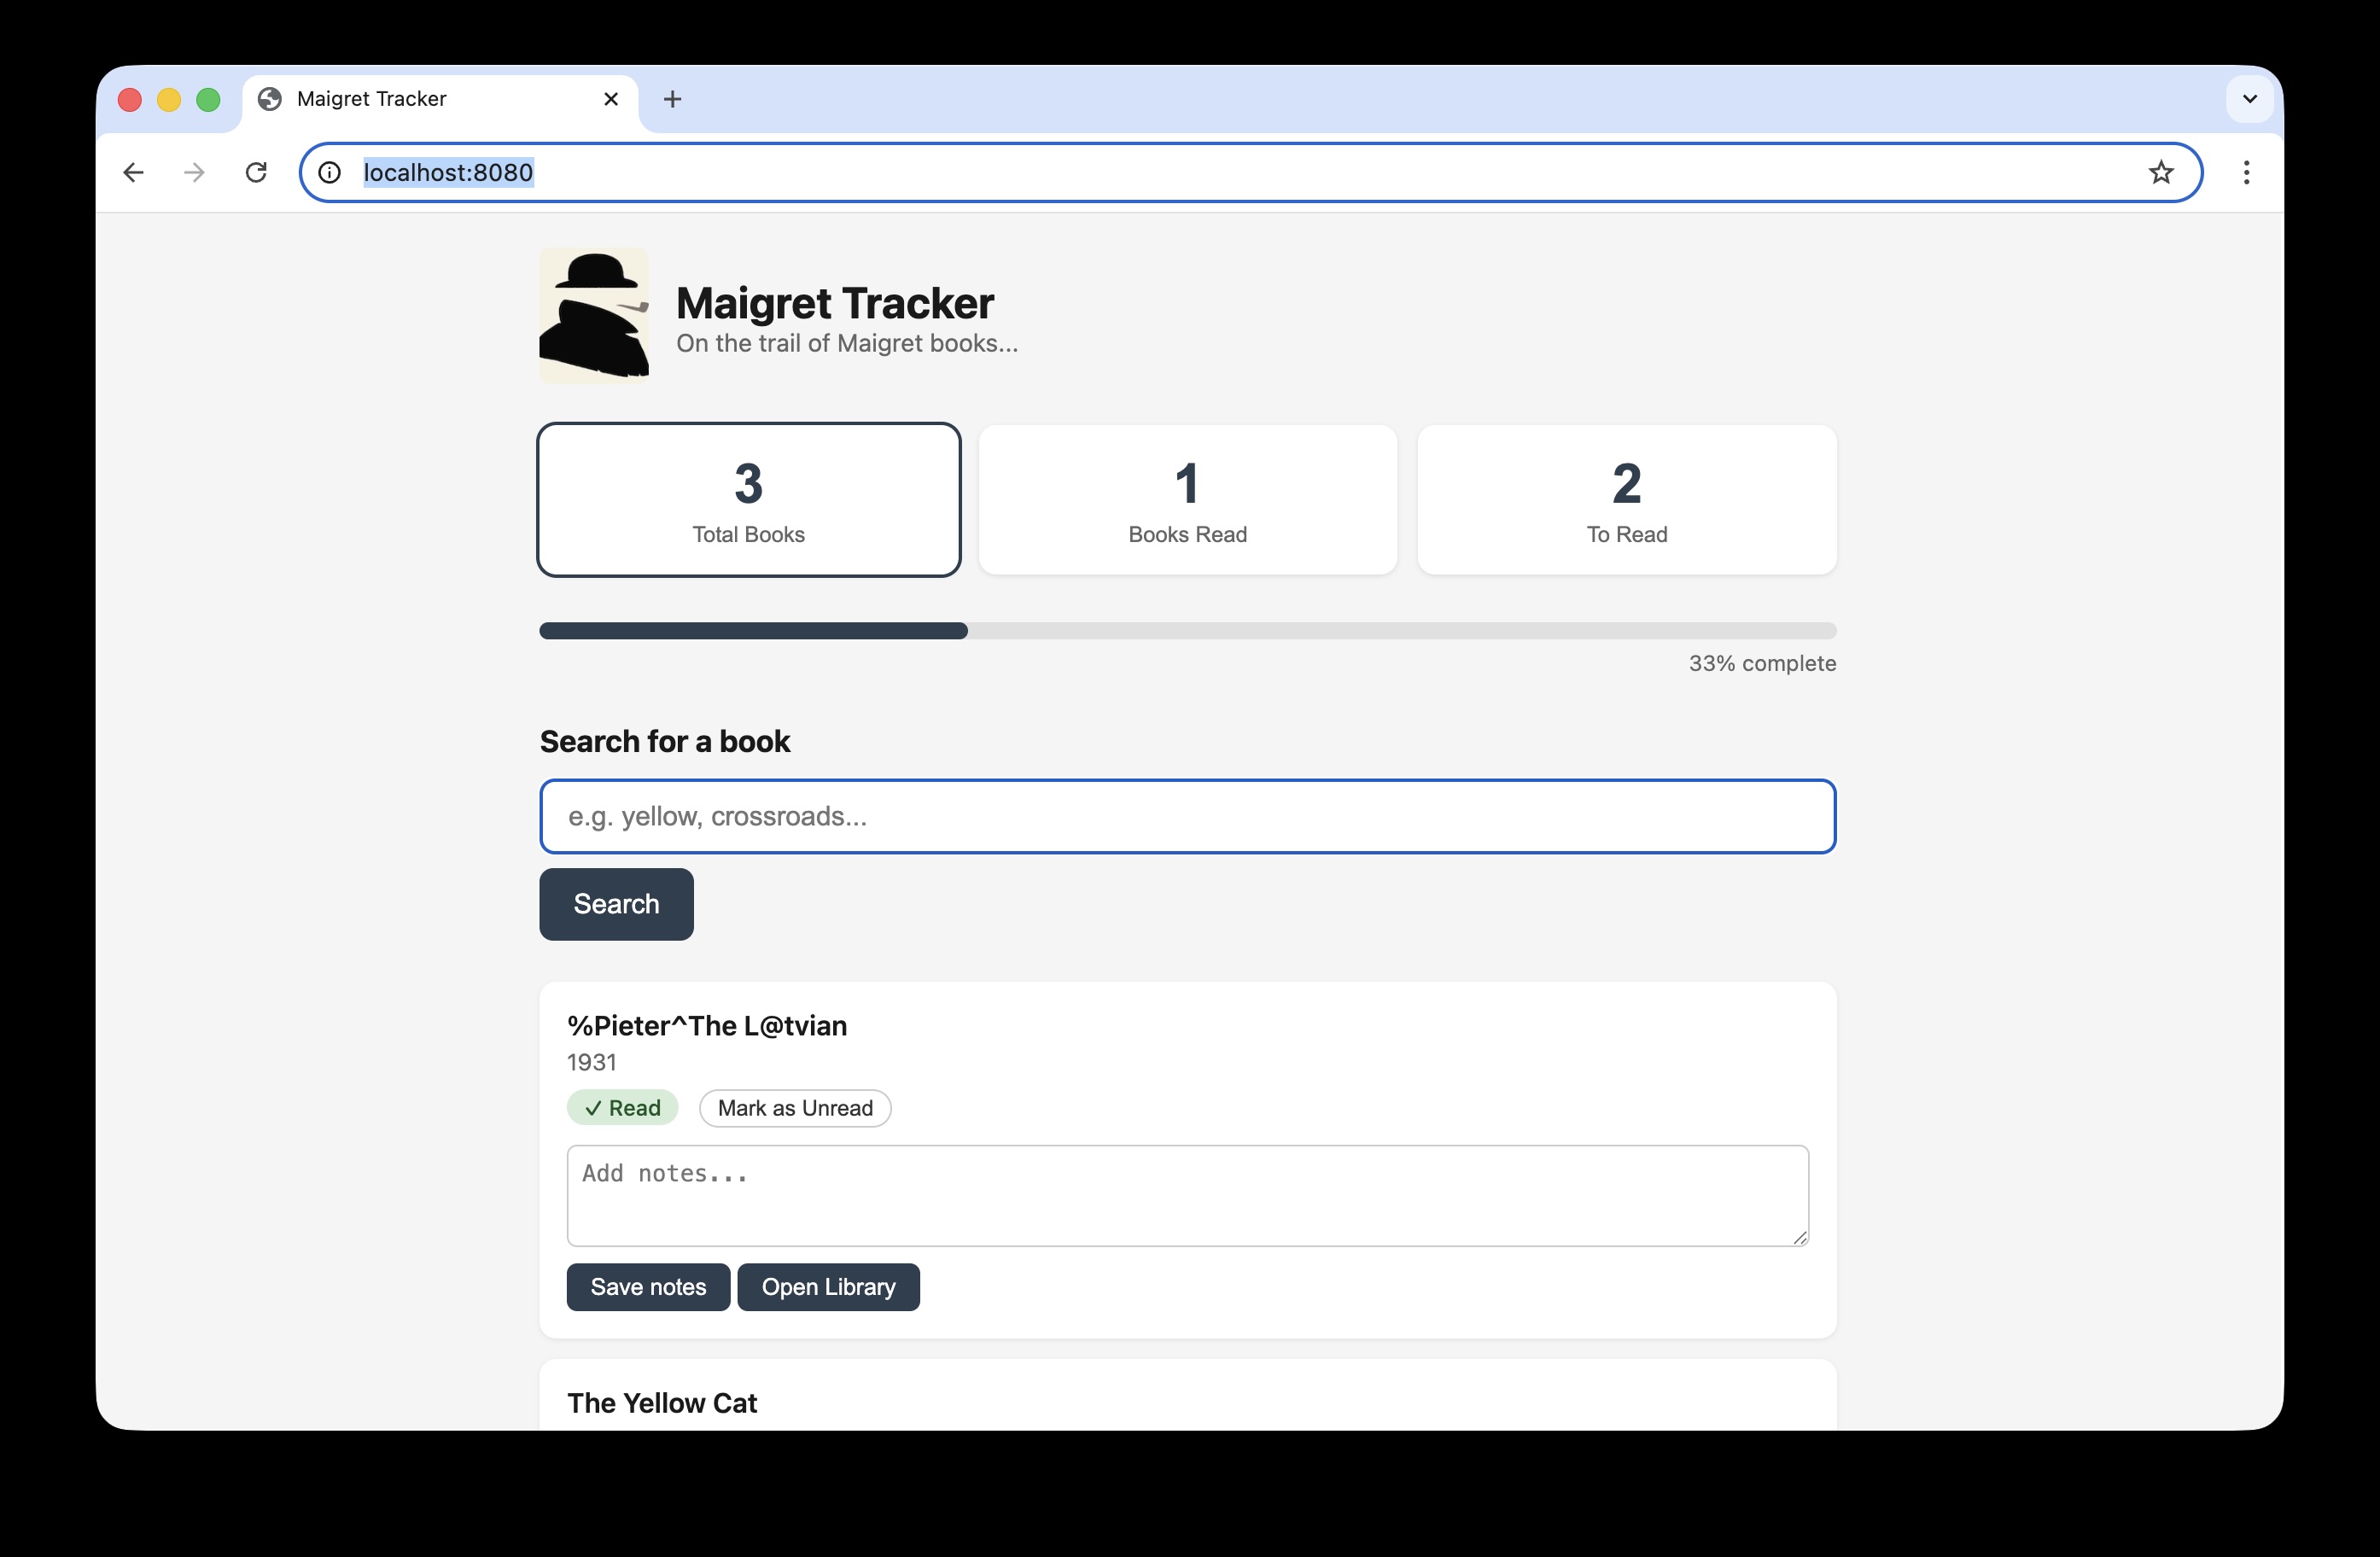
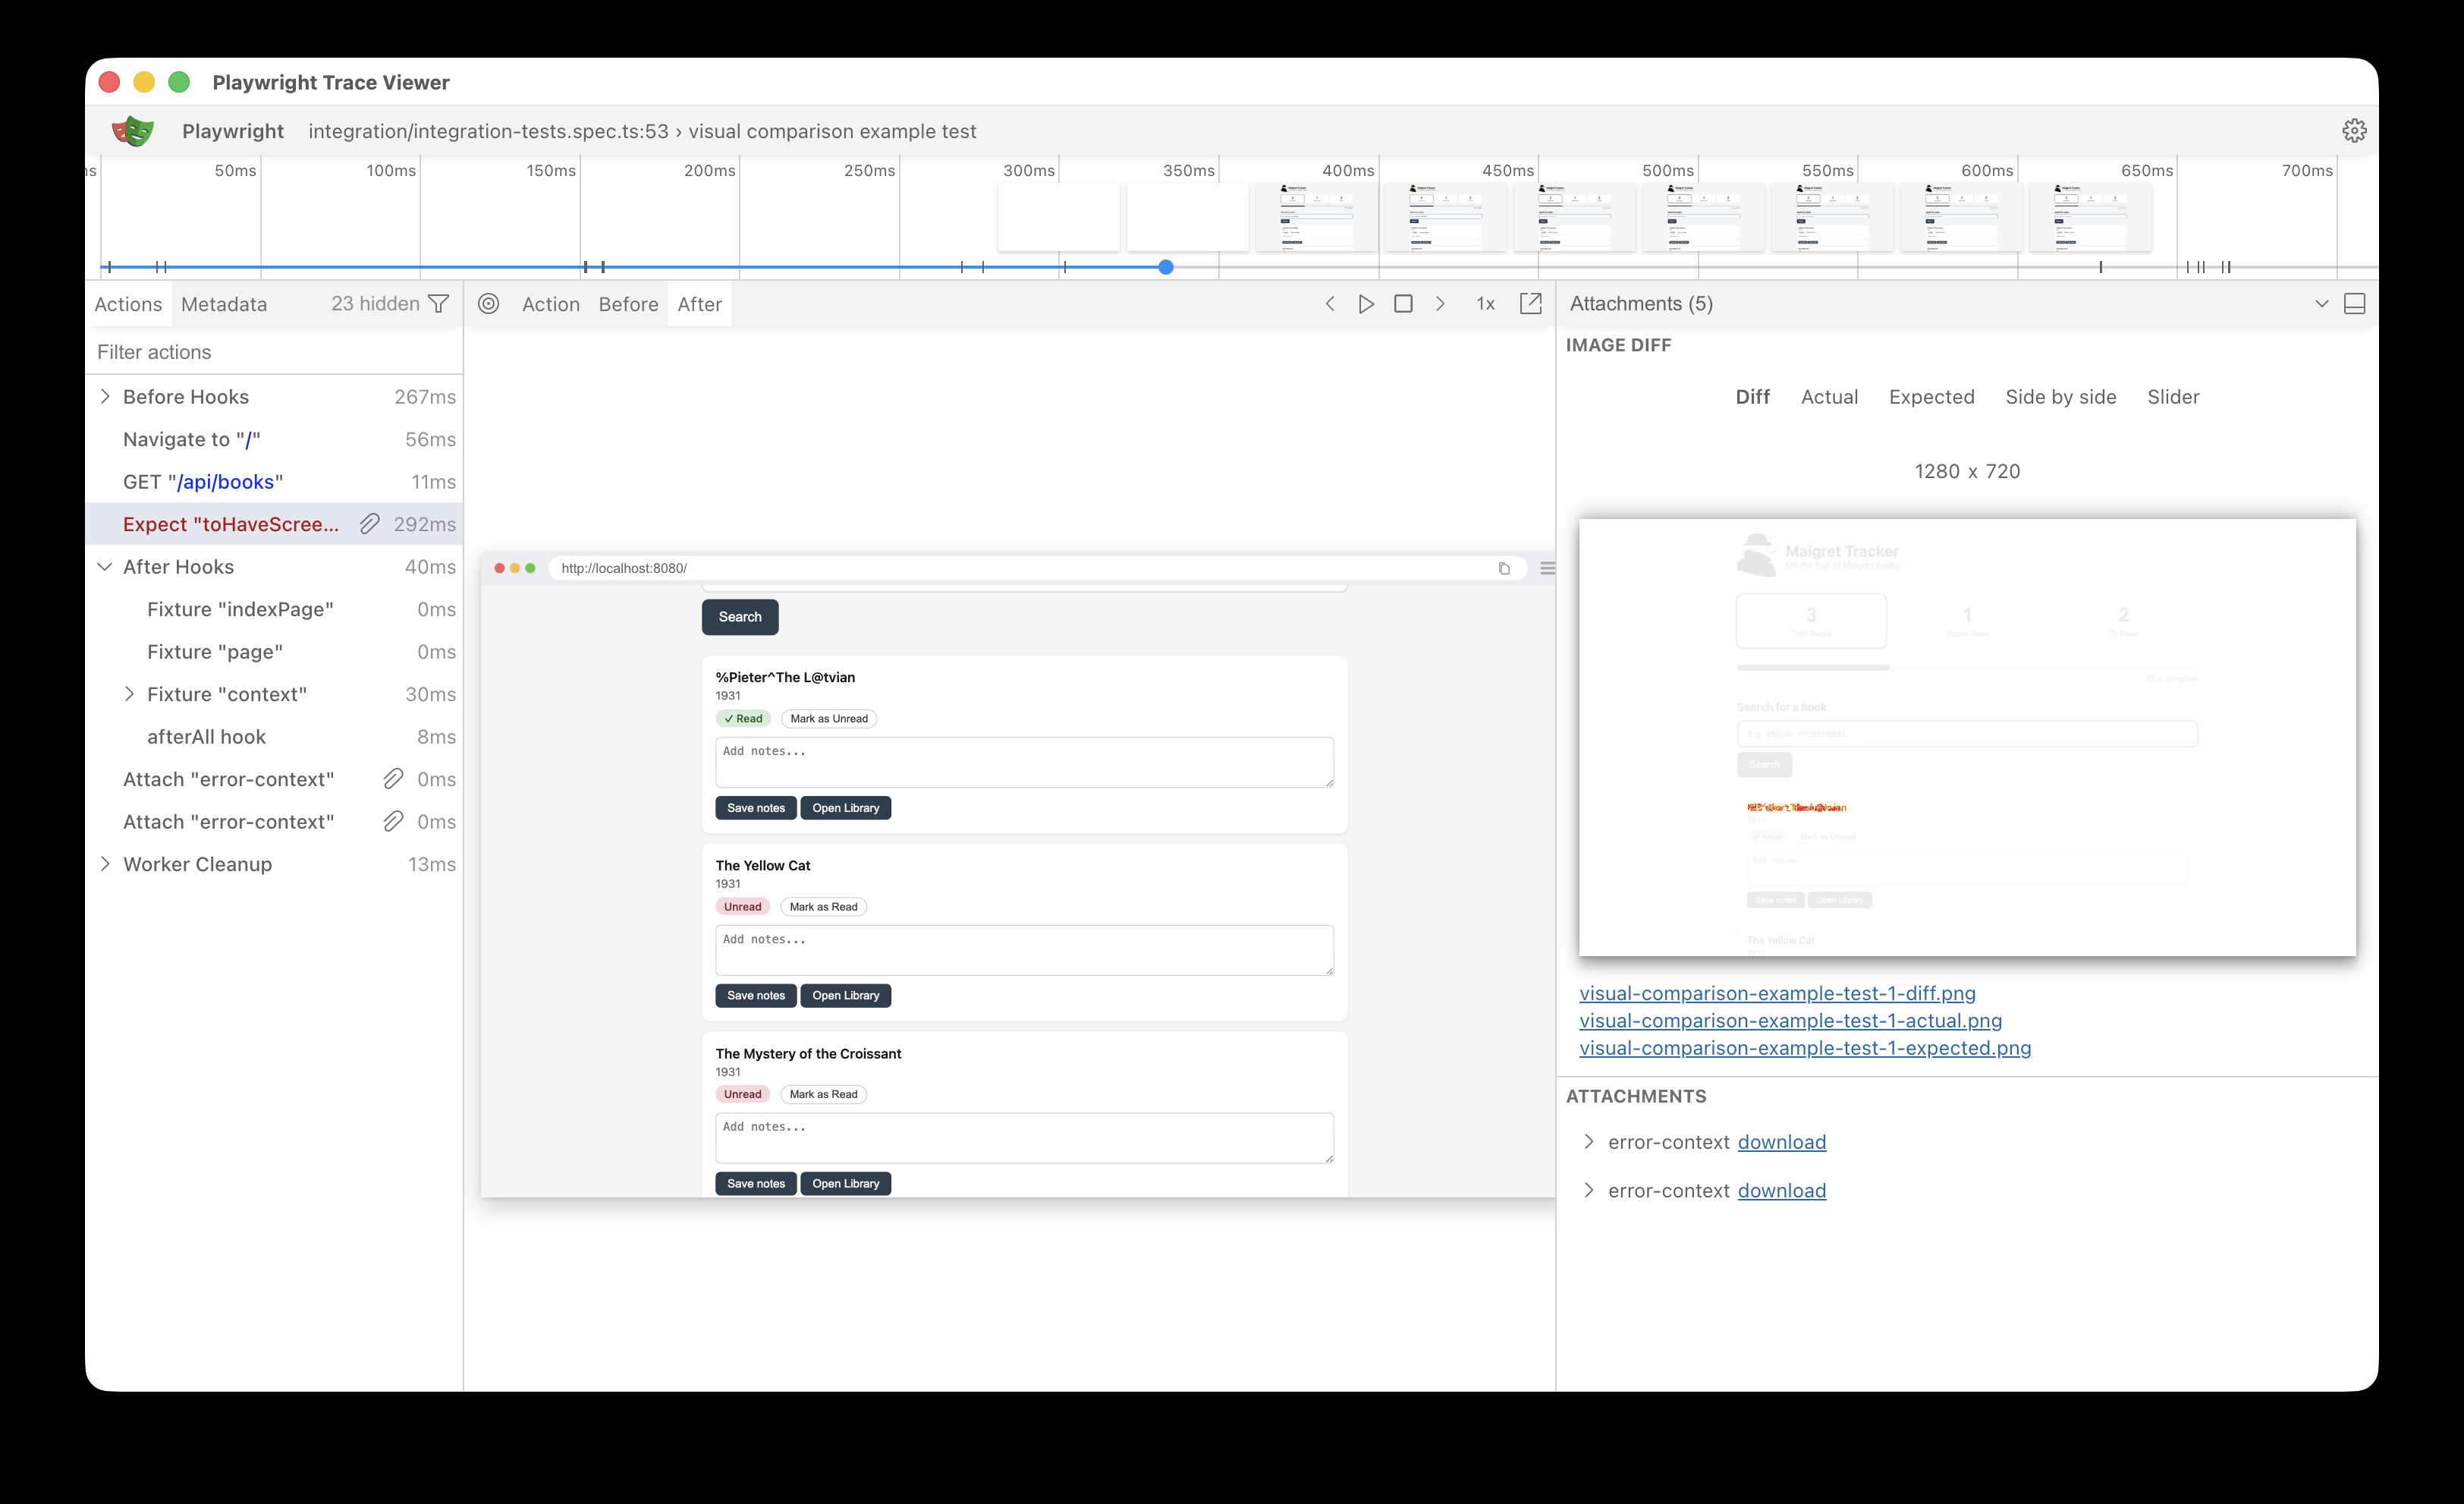
If we change the image on screen- for example the first book title is corrupted to %Pieter^The L@tvian the image on screen is different to what is expected and the test fails as expected.
Trace viewer helpfully shows what the differences are:
This is a simple example which demonstrate the utility of the tool, practical use cases would be to verify page layouts, fonts, colours etc.
One caveat with this tool is the screenshot may vary from device to device (different resolution, browser settings etc.) so the recommended approach is to run these tests in a CI pipeline (so the environment, browser, OS etc. is stable and repeatable). These tests are applied to this project’s pipeline in the section below.
Frame Locator
The web application displays book cards (book title, publish details etc) and also a button to open Open Library details about that book. That data is fetched in an iframe, i.e. another html page embedded inside the original web page.
This can represent a challenge when building ui tests (especially if there is a cross domain element), its effectively opening another browsing context within the existing DOM, which can complicate selectors.
However playwright has a useful FrameLocator class which scopes locator access to within that frame, so they can be accessed within the parent page context.
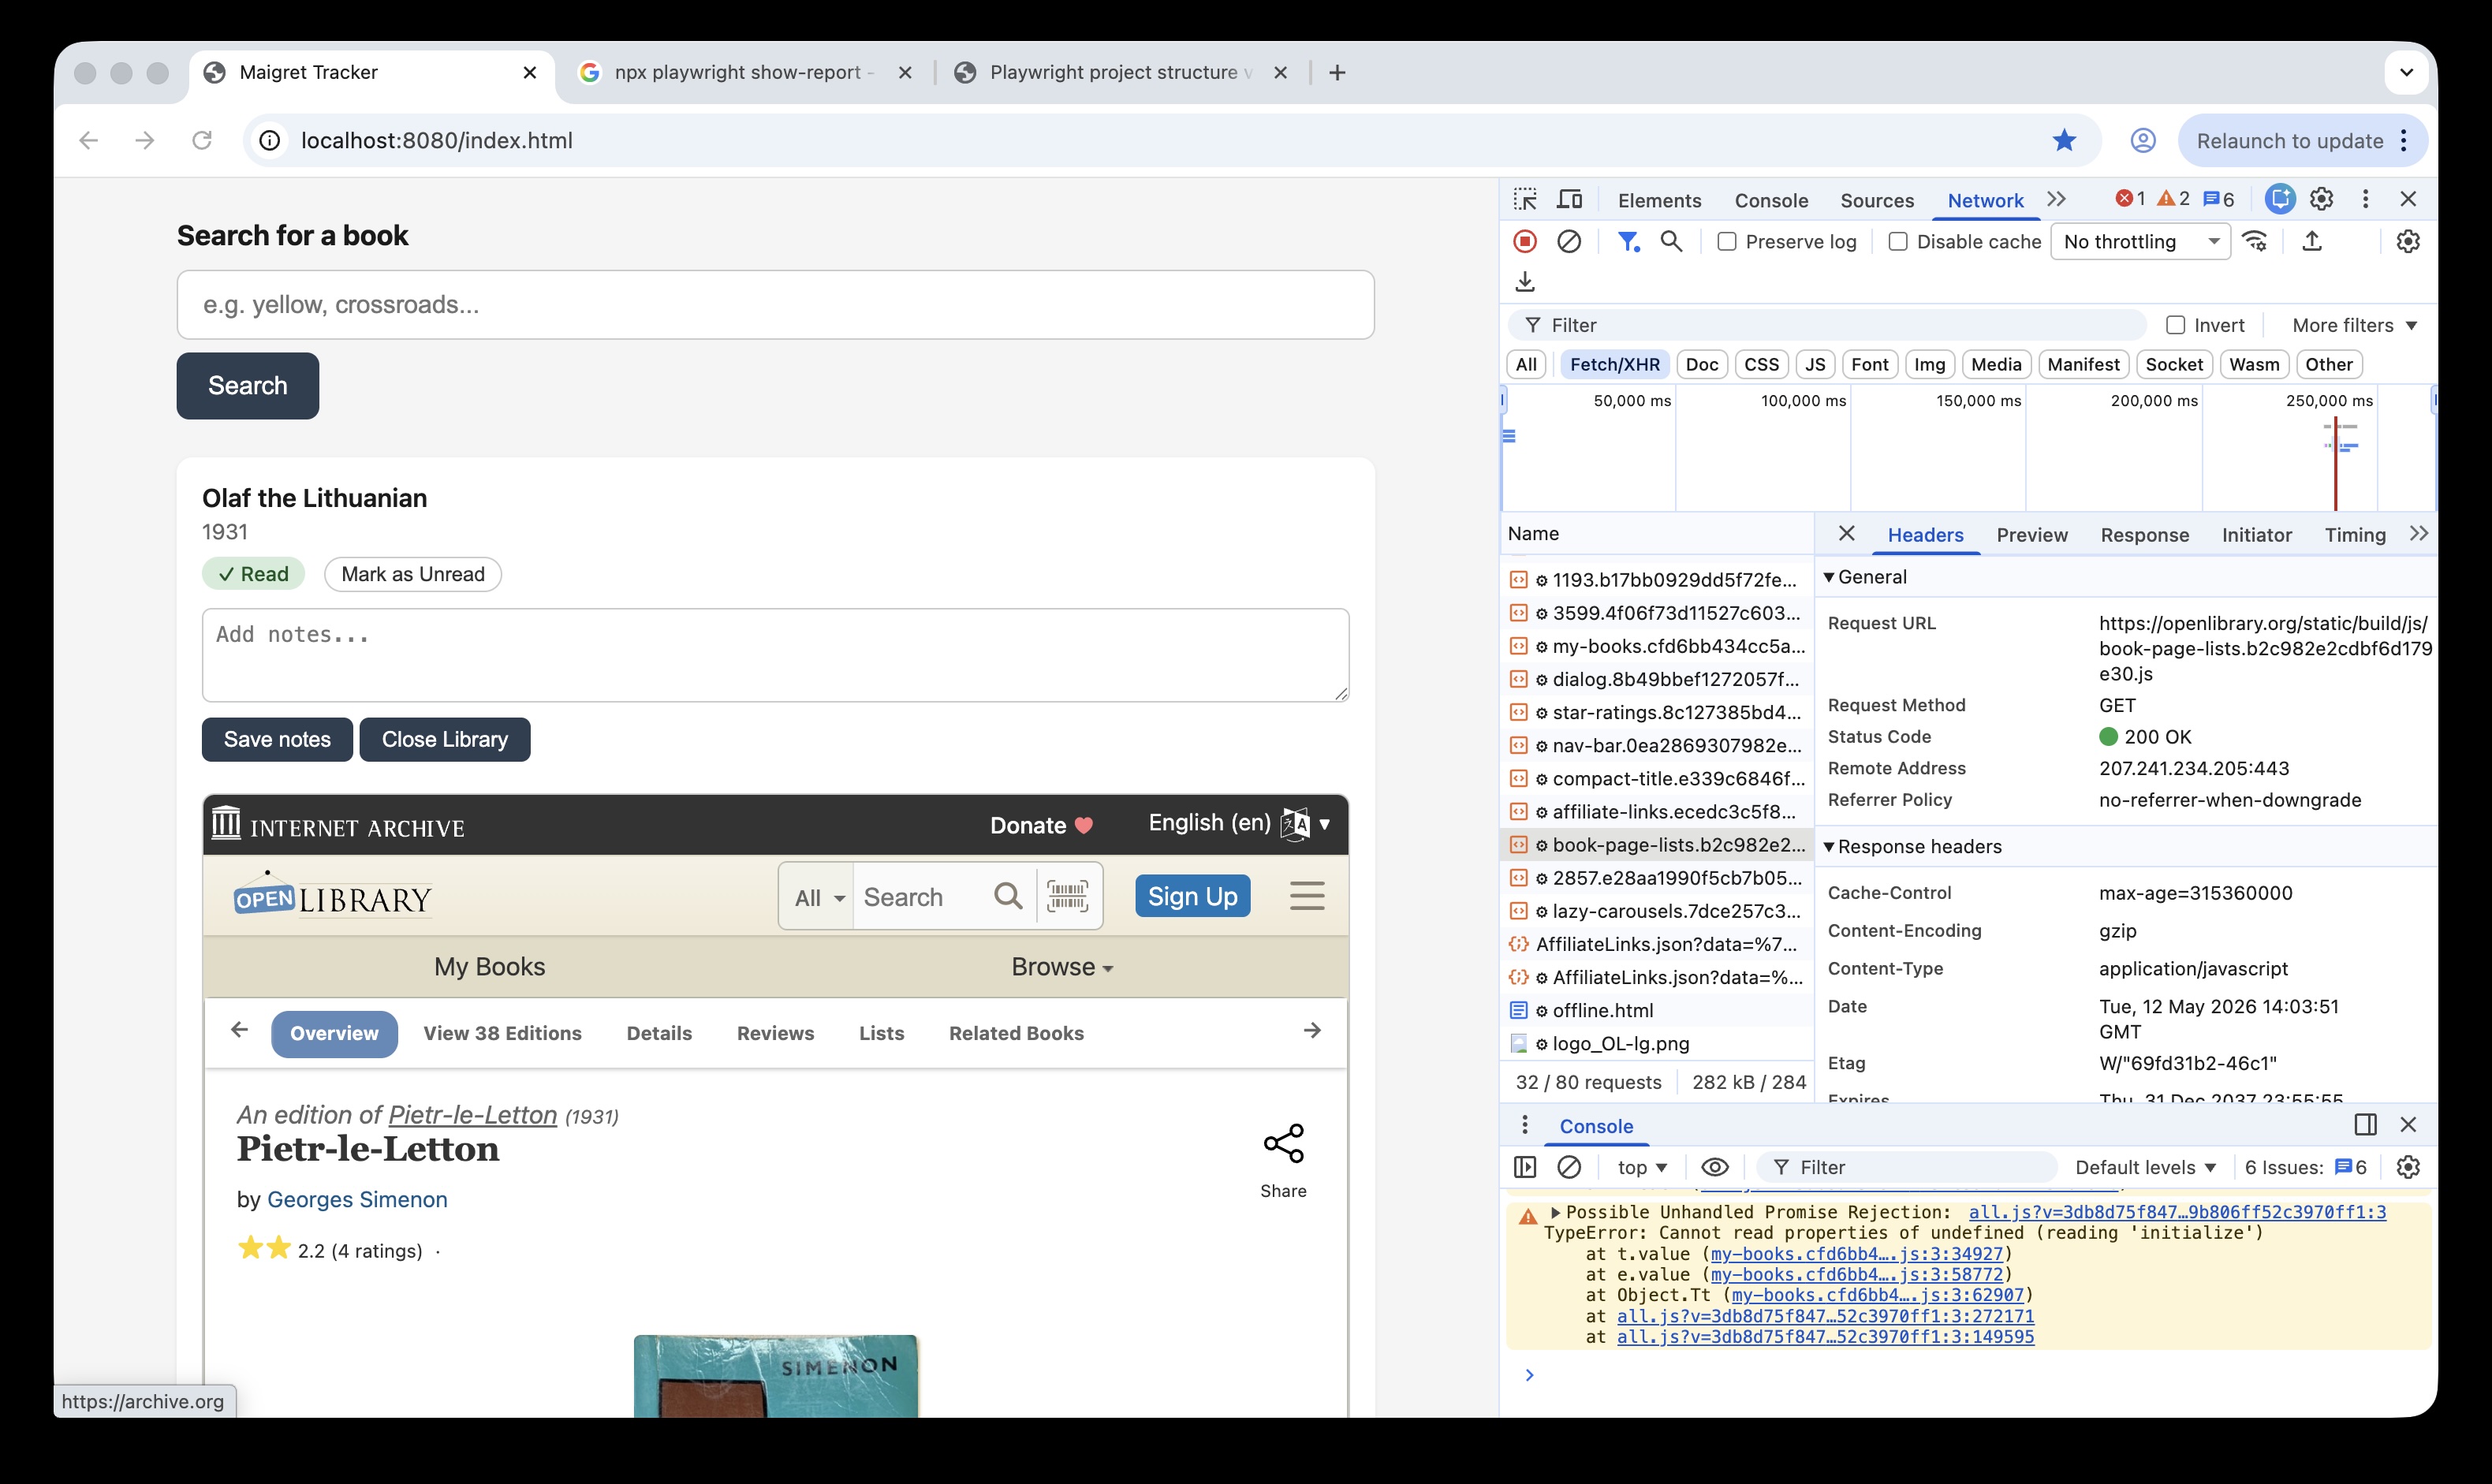
Cross-origin iframes can be a challenge in other tools like Selenium, but Playwright handles them cleanly via contentFrame()— as this test demonstrates with an embedded openlibrary.org frame inside a localhost app. The test below opens an Open Library iframe for a selected book, verifies the content has loaded, and confirms tab interaction works within the frame.
test('opening the Open Library info for a selected book', async ({ indexPage, page }) => {

await indexPage.goto();
await indexPage.libraryBtn("Olaf the Lithuanian", 'Open').click();

// set const to get the iframe for the selected book

const iframeLocator = page.locator('iframe[id="library-frame-Olaf the Lithuanian"]');

// Wait until Open Library src is loaded into the iframe

await expect(iframeLocator).toHaveAttribute('src', /openlibrary\.org/, { timeout: 10000 });

// contentFrame() returns a FrameLocator — gives full Playwright locator access inside the iframe

const openLibraryFrame = iframeLocator.contentFrame();

// verifies the book card has loaded the Open Library logo

await openLibraryFrame
.locator('img.logo-icon[alt="Open Library logo"]')
.waitFor({ state: 'visible', timeout: 15000 });

// verifies able to use elements within the iframe to interact, click and change tabs

await openLibraryFrame
.getByRole('link', { name: 'Details' })
.click();
  await expect(openLibraryFrame.getByTitle('Book Details')).toBeVisible();

})
For more detail on frame.locator see the official documentation.
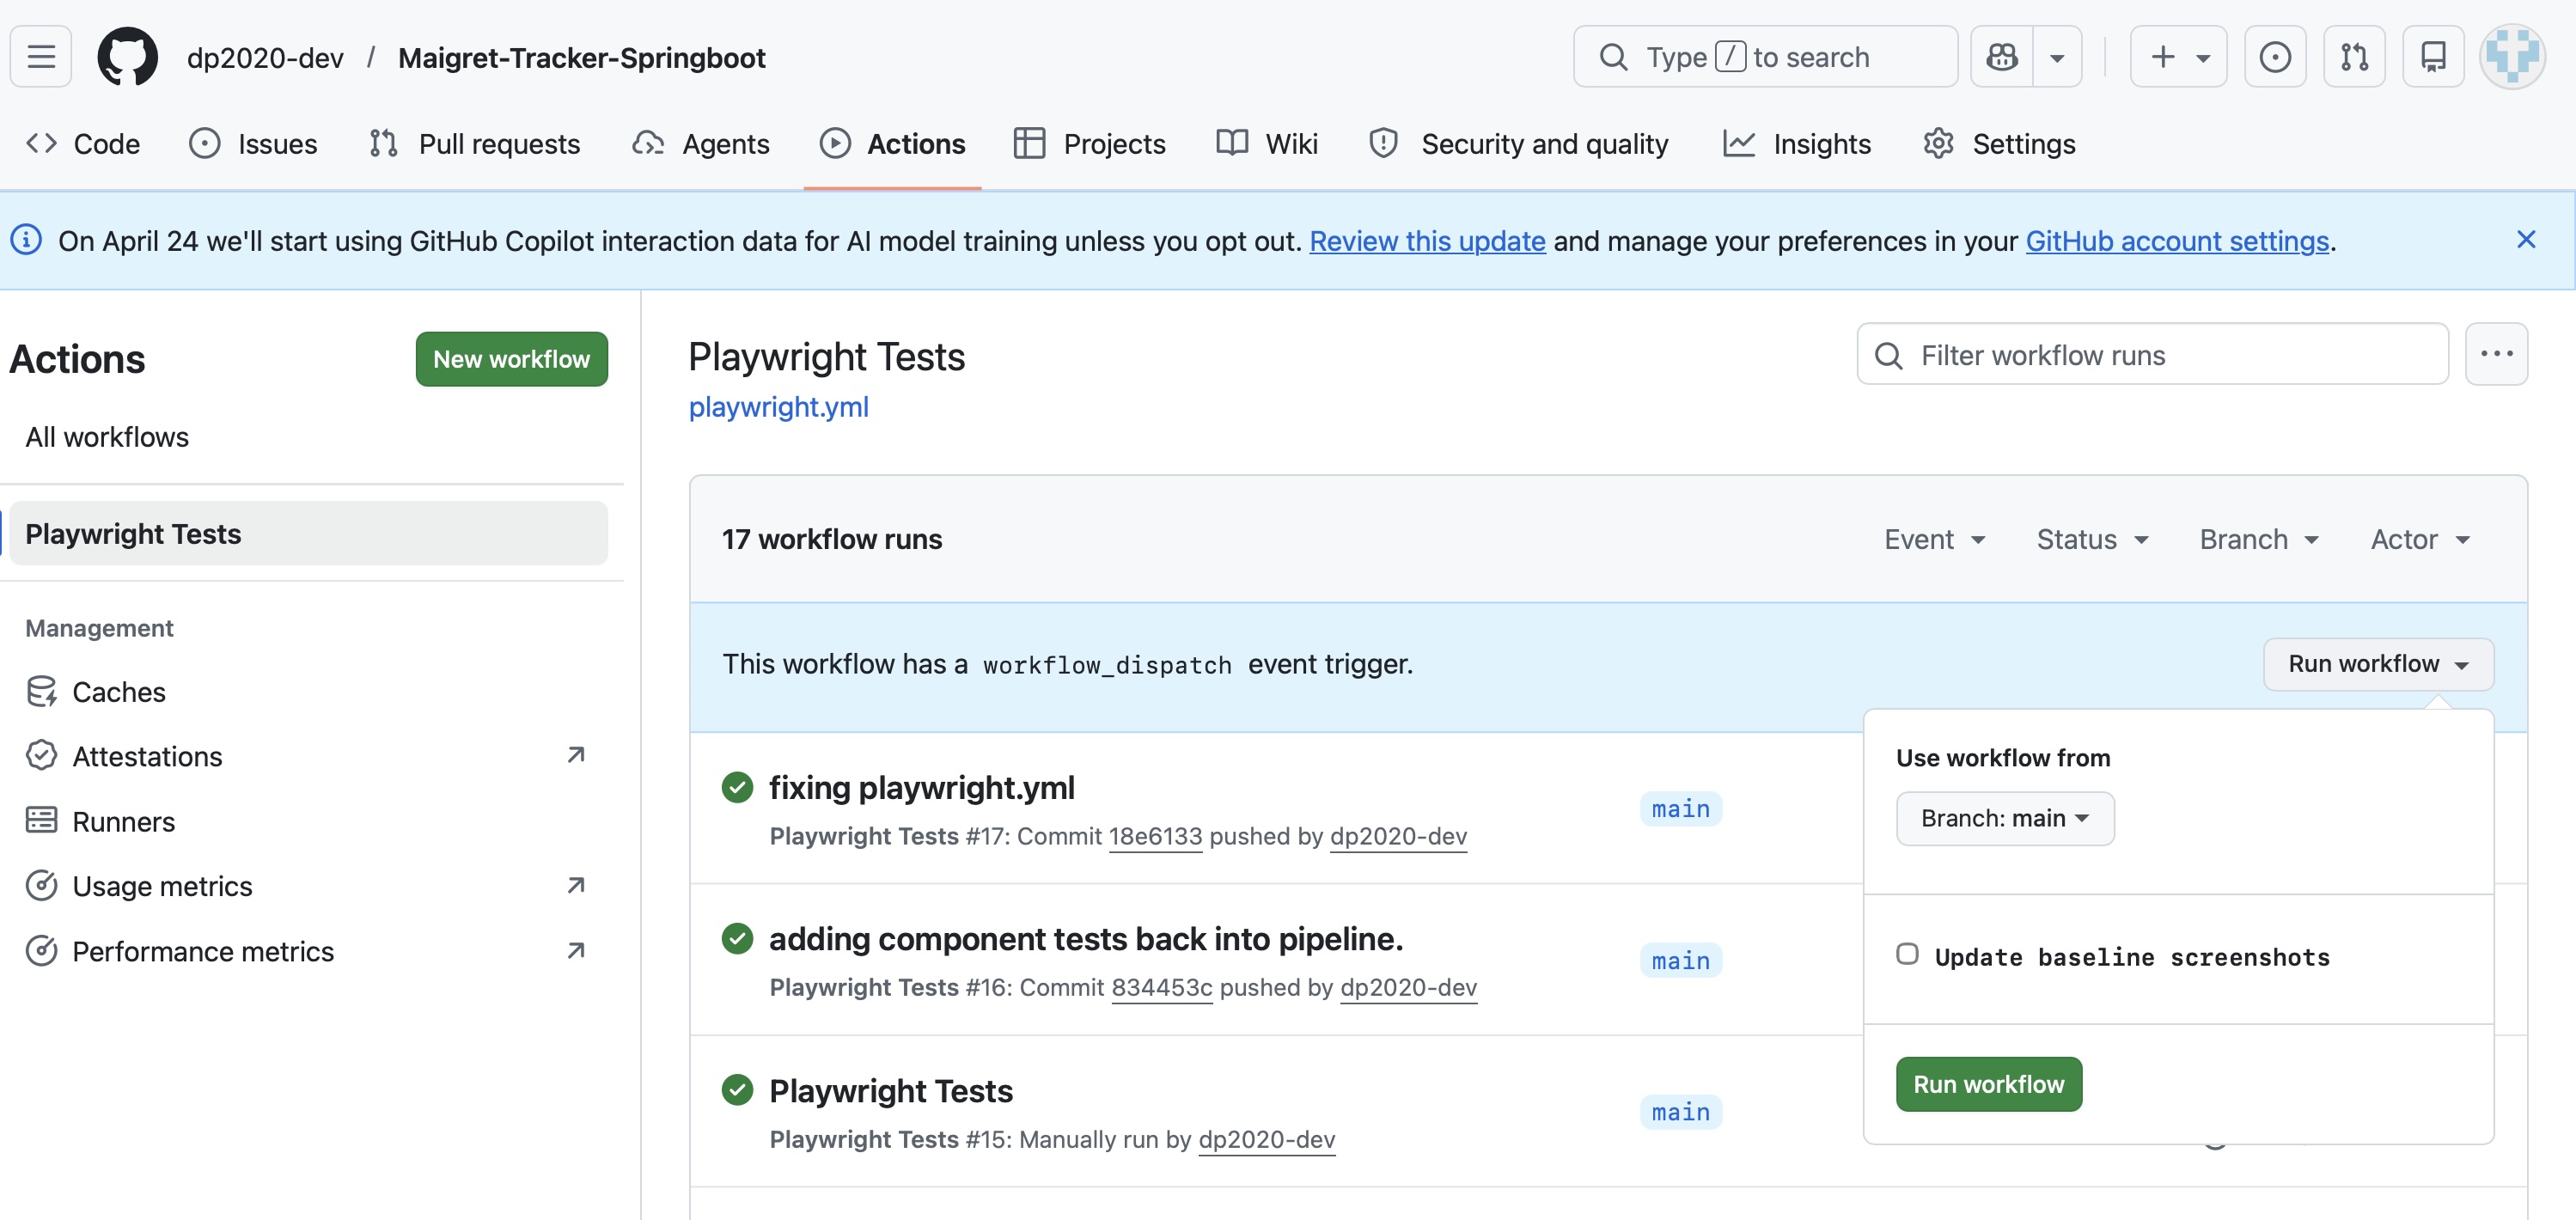
Running tests in a CI pipeline
In a CI/CD project, where many devs and QAs are pushing code to the main branch, adding Playwright tests to the pipeline means that browser regression testing can happen automatically as part of code integration.
In this project, we have component and integration tests- note that other projects would also have an end to end folder (e2e) which would cover user action tests (e.g. log in, add records etc.) but for now we will add the component and integration tests to the CI pipeline.
Configuring the tests to run in a CI pipeline
For this project, the CI tool is GitHub Actions, and to incorporate the playwright tests in the CI pipeline a yaml file is pushed to the repo to set up the test pipeline action. The following details are for GitHub, but the same principle applies to Azure and AWS, the relevant settings are applied in a yaml file.
For GitHub, the file is located in .github/workflows/playwright.yml. The full yaml file is located here and include the steps to download dependencies, the required browsers and other dependencies, but the following snippets are the key settings relevant to this project:
branches specifies which cloud repo branches will run the tests:
on:

push:

branches: [ main, master ]

pull_request:

branches: [ main, master ]
Run Playwright tests specifies which set of tests to run (a project may have tests which are only runn locally, so can be excluded here):
- name: Run Playwright tests

run: npx playwright test tests/component tests/integration
Running the visual comparison tests in a pipeline, updating baseline screenshots.
Given the visual tests are good candidates for regression testing, and require a stable environment to ensure the comparison is like for like, it makes sense to include them in the pipeline tests. In this project, the tests are included in the integration test class. <!– Initially, the visual comparison failed in the Github pipeline, as it doesn’t have a baseline image to compare with:
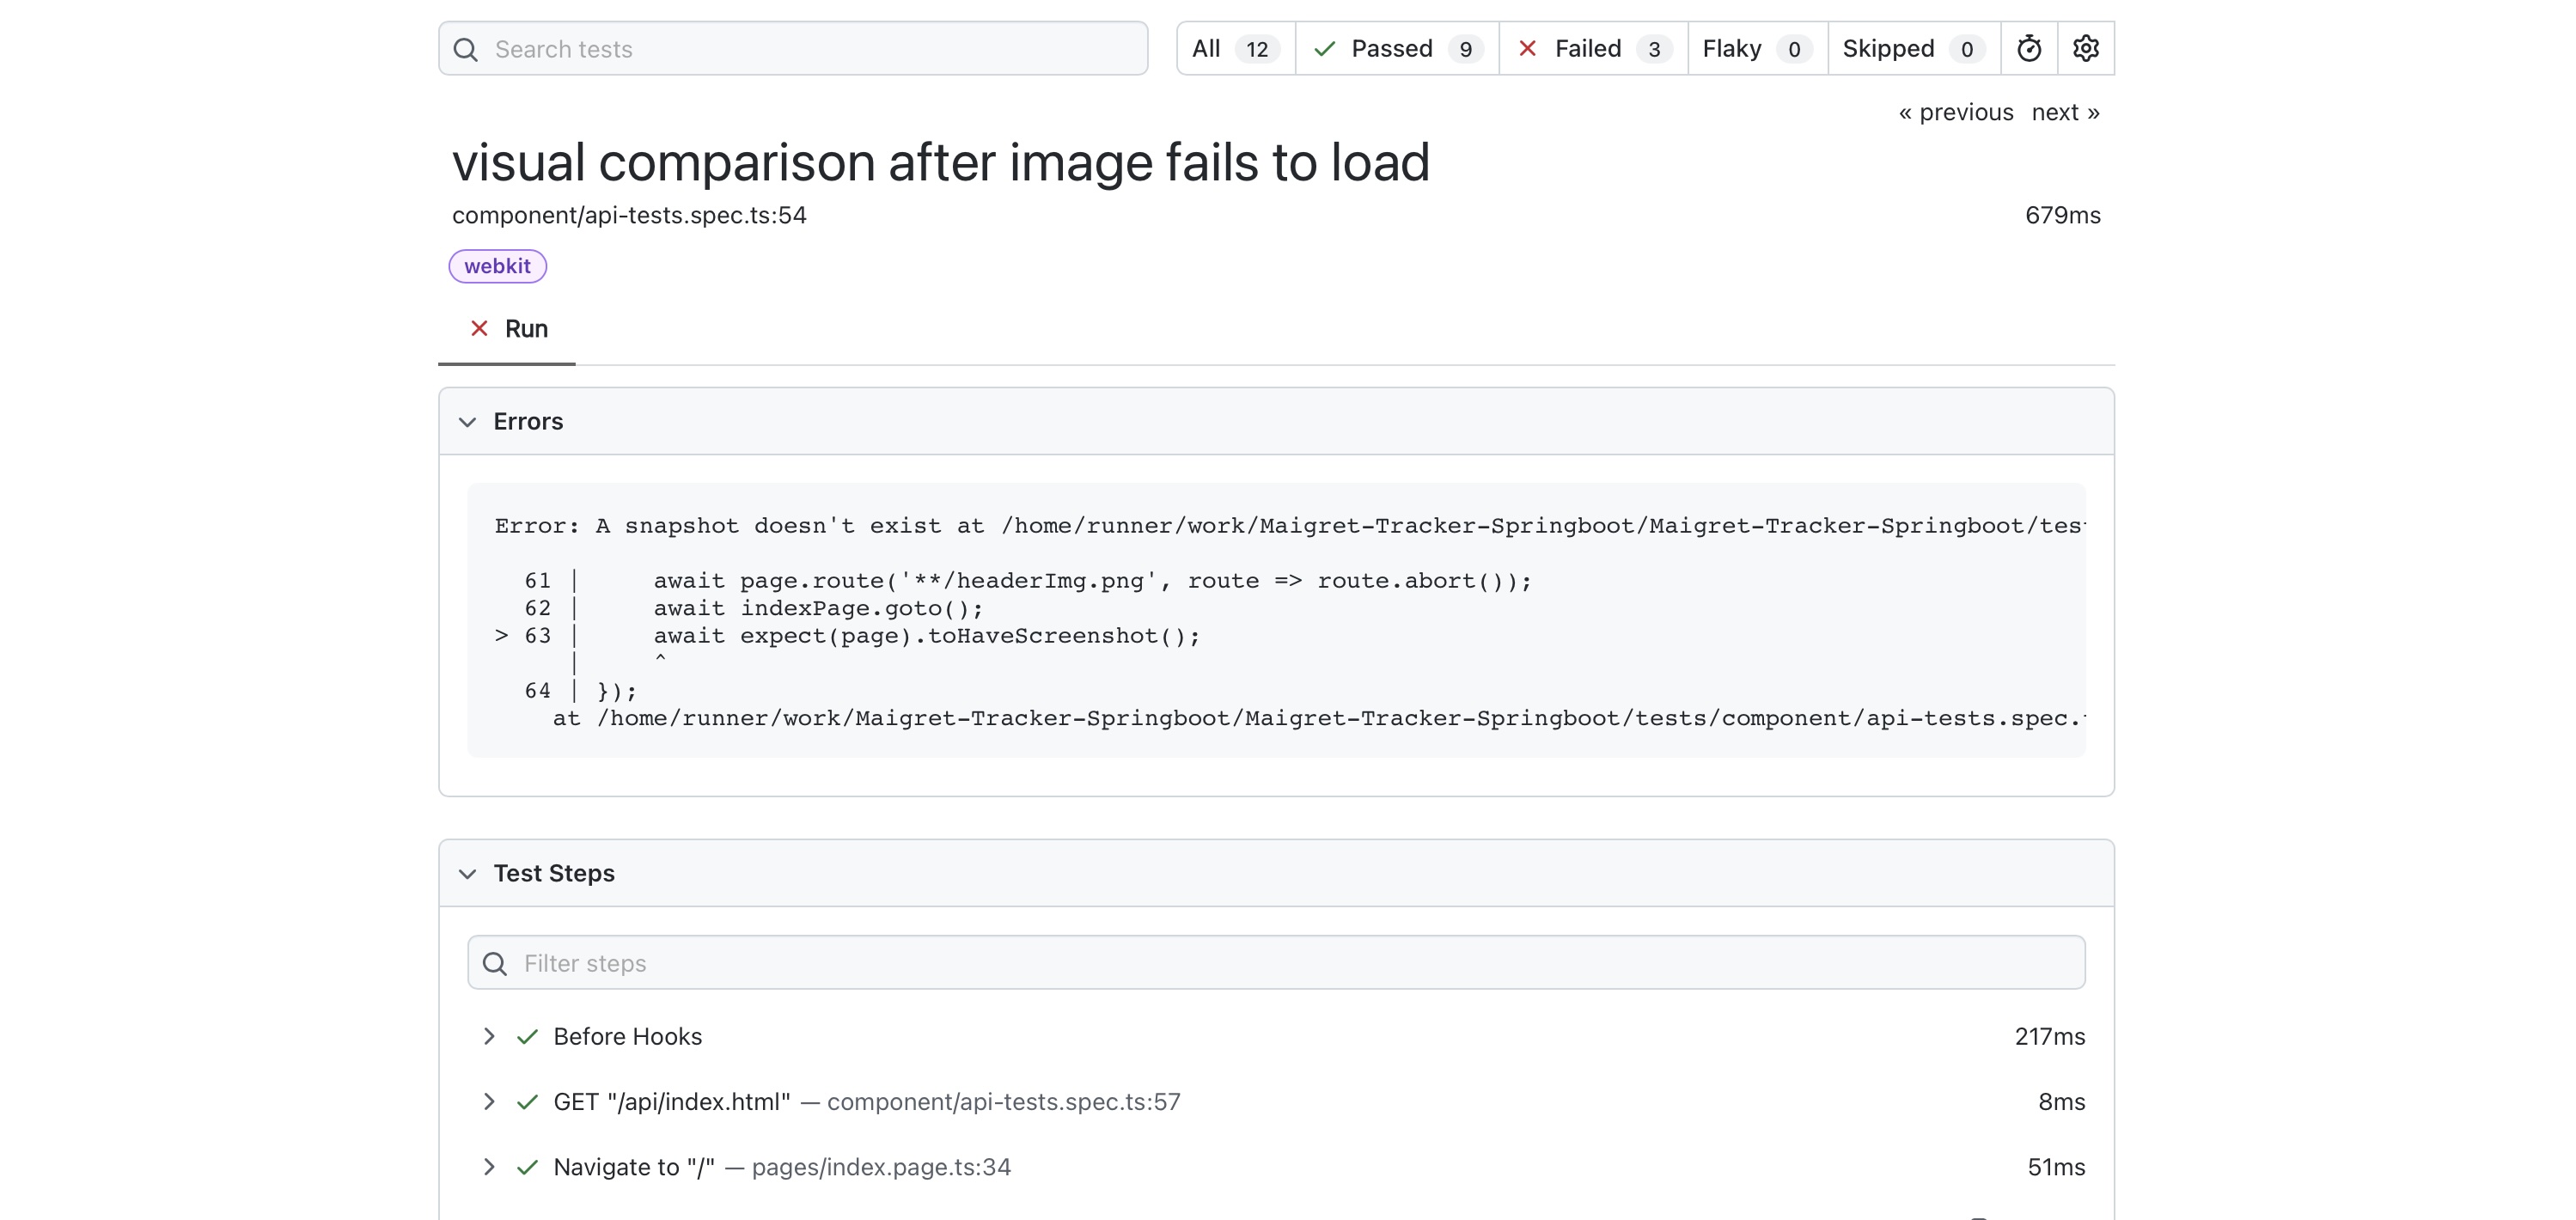 –>
–>
To add the initial baseline screenshot, or to update it if the screen/page has been updated, run the following bash command and then commit/push:
npx playwright test tests/integration --update-snapshots
This saves the baseline images from a successful test run in tests/integration/…snapshots:
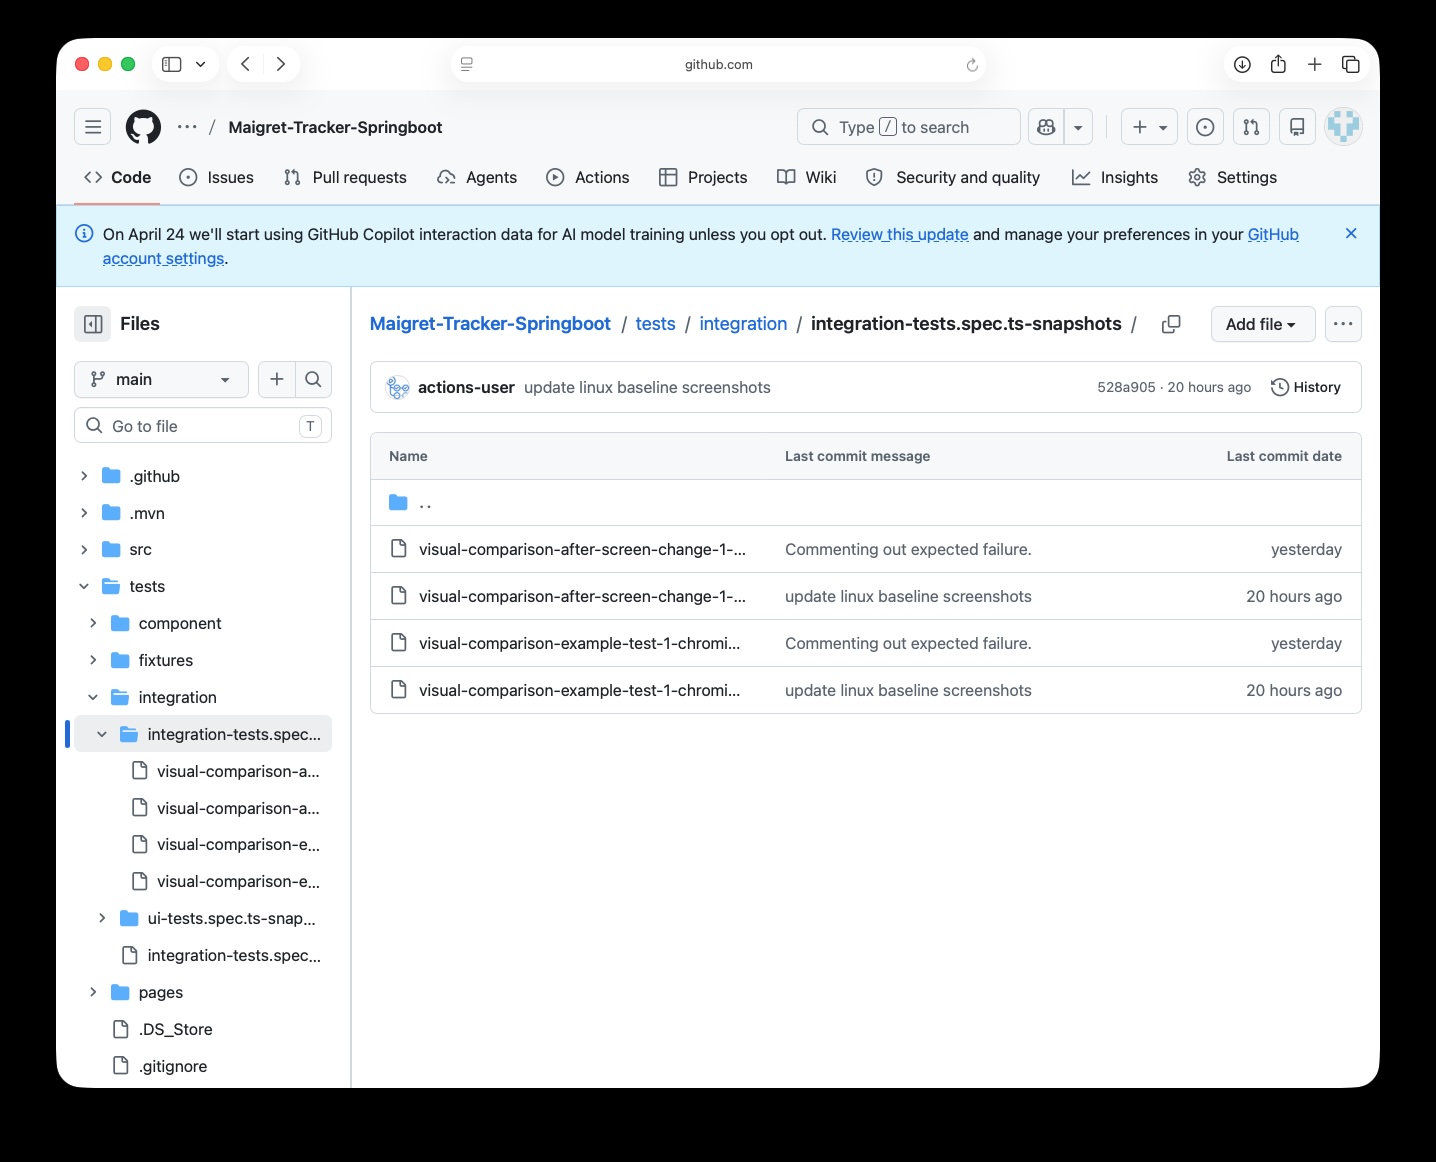
The images are then updated and the visual comparison tests pass in the pipeline:

Summary
This example project proved an ideal opportunity to apply an initial Playwright structure using Playwright POM model (with abstracted pages and fixtures). My advice when applying a Playwright framework is to look at the system under test and map that structure to the Pages model, the file structure example above and the Playwright documentation will help guide on best practice on placing the related files from there.
This post also covered some of the classes and tools available in Playwright, this is just a sample but the page.route for APIs, the frame.locator and image comparison are good examples of productive, useful tools which make Playwright a productive tool for the test automation engineer.