Getting hands on with test tools- Cypress versus Playwright
28 Oct 2023This post will give some practical advice on installing Cypress and Playwright to create and run some simple UI tests, and a brief comparison between the two tools.
Alongside Selenium, Cypress and Playwright are currently amongst the most widely used test automation tools. There is a lot of discussion about the pros and cons of each tool, which is the most suitable for a given project etc. but you may want to try these tools out for yourself, this post will help you to get up and running, and run some basic UI tests.
To evaluate these tools myself, I set up a Git repo to do some basic UI automation, one using Cypress the other Playwright to compare them side by side (I will add Selenium Webdriver soon). If you can set up these tools locally, you will be able to follow and implement the simple test plan outlined below, or alternatively clone the material in the repo itself and run it.
ⓘ For reference, I installed both tools on a Mac, and the system under test/code used was JavaScript. However, the instructions I link to cover Windows/Linux and other code bases.
Test Plan
To compare these test tools, I used the 5W approach in ChatGPT to come up with this outline of a test scope:
- Page Loads: Ensure that specified page load correctly.
- Navigation: Verify the navigation within the web shop.
- Registered User Login: Test the login process for registered users.
- Add to Basket and Checkout: Check the functionality of adding items to the basket and completing the checkout process.
The system under test used here (https://www.demoblaze.com) has proven to be well suited for e-commerce UI testing, but you of course may have a preferred alternative (generally we’ll be covering standard e-commerce transactions).
Setting up Cypress and run tests
The documentation on installing Cypress itself is pretty user friendly, so rather than repeat material this section will highlight some of the key areas.
https://docs.cypress.io/guides/getting-started/installing-cypress#System-requirements
ⓘ If you see a ‘Cypress Configuration Error’ when running ‘npx cypress open’ , ensure you are running cypress from the right folder level, it needs to be in a folder above the cypress.config.js level to avoid any config errors.
Provided the installation has been successful, my preferred approach is to open a command line/terminal in the project folder, and run:
npx cypress openThis should open up the Cypress Launchpad, and for this post we’ll be concentrating on E2E testing (to cover an e-commerce system).
Once cypress is up and running in the browser, my approach was to follow the Getting Started page to set up the first ‘E2E’ test, and build on that to start covering the project plan:
https://docs.cypress.io/guides/end-to-end-testing/writing-your-first-end-to-end-test
Setting the baseURL
For UI tests it’s very useful to not have to explicitly use the url of the system under test (e.g. www.demoblaze.com). We can define the baseUrl in the cypress.config.js in project root. Cypress calls this base url when ‘/’ is used in an E2E test, e.g.
cy.visit('/') // uses the baseUrl (i.e. www.demoblaze.com in our example) in the cypress.config to open the url.Fixtures
A lot of the UI tests in this plan use the same user details info for each test, and rather than repeat those strings in each test, we can define a fixture file to store all our log in data, and reuse it in each test.
Example:
In the fixtures file, the userDetails class contains user log in details:
{
"username": "test",
"password": "test",
"welcomeText": "Welcome test",
"name": "Sid Spendalot",
"country": "UK",
"city": "Testville",
"creditCard": "554433221",
"month": "April",
"year": "2023"
}
This class is used in E2E tests, e.g. in E2EloginPurchases test file, we get the fixture file:
..and from that line on we can use the details from the fixture file in the test (i.e. the E2E test class is getting the userDetails.password & userDetails.username are those defined in the fixture file):
In addition to Cypress documentation, this blog proved useful in understand more about Cypress Fixtures: [https://testersdock.com/cypress-fixtures/](https://testersdock.com/cypress-fixtures]
Time Travel
The time travel feature is effectively a record of the changing state of the system under test, which has proven to be invaluable in understanding how the website behaves in response to our test inputs and for debugging.
Lets demonstrate this by looking at an E2E test that uses our baseUrl set in config, and some of our imported fixture data.
Example
The E2EloginPurchases E2E test verifies the log in process works with a valid username/password, and checks a successful log in message appears on screen.
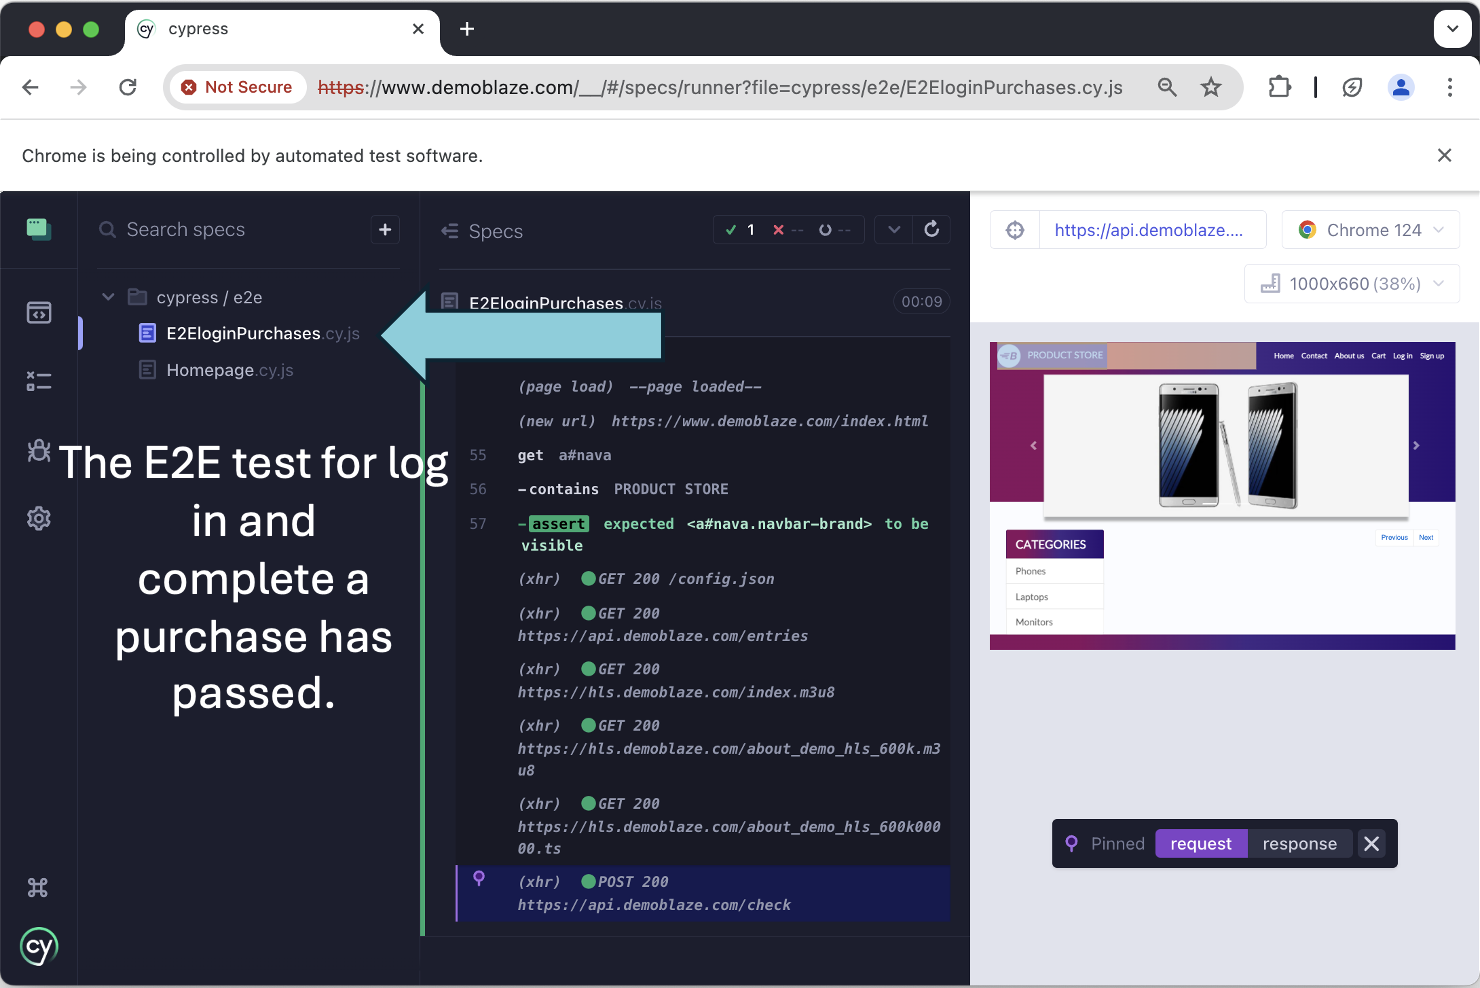
In the spec window of Cypress browser we can see our test code has used our configured baseURL and knows ‘/’ should be ‘www.demoblaze.com’, and uses the imported config to pass in userName & userPassword.
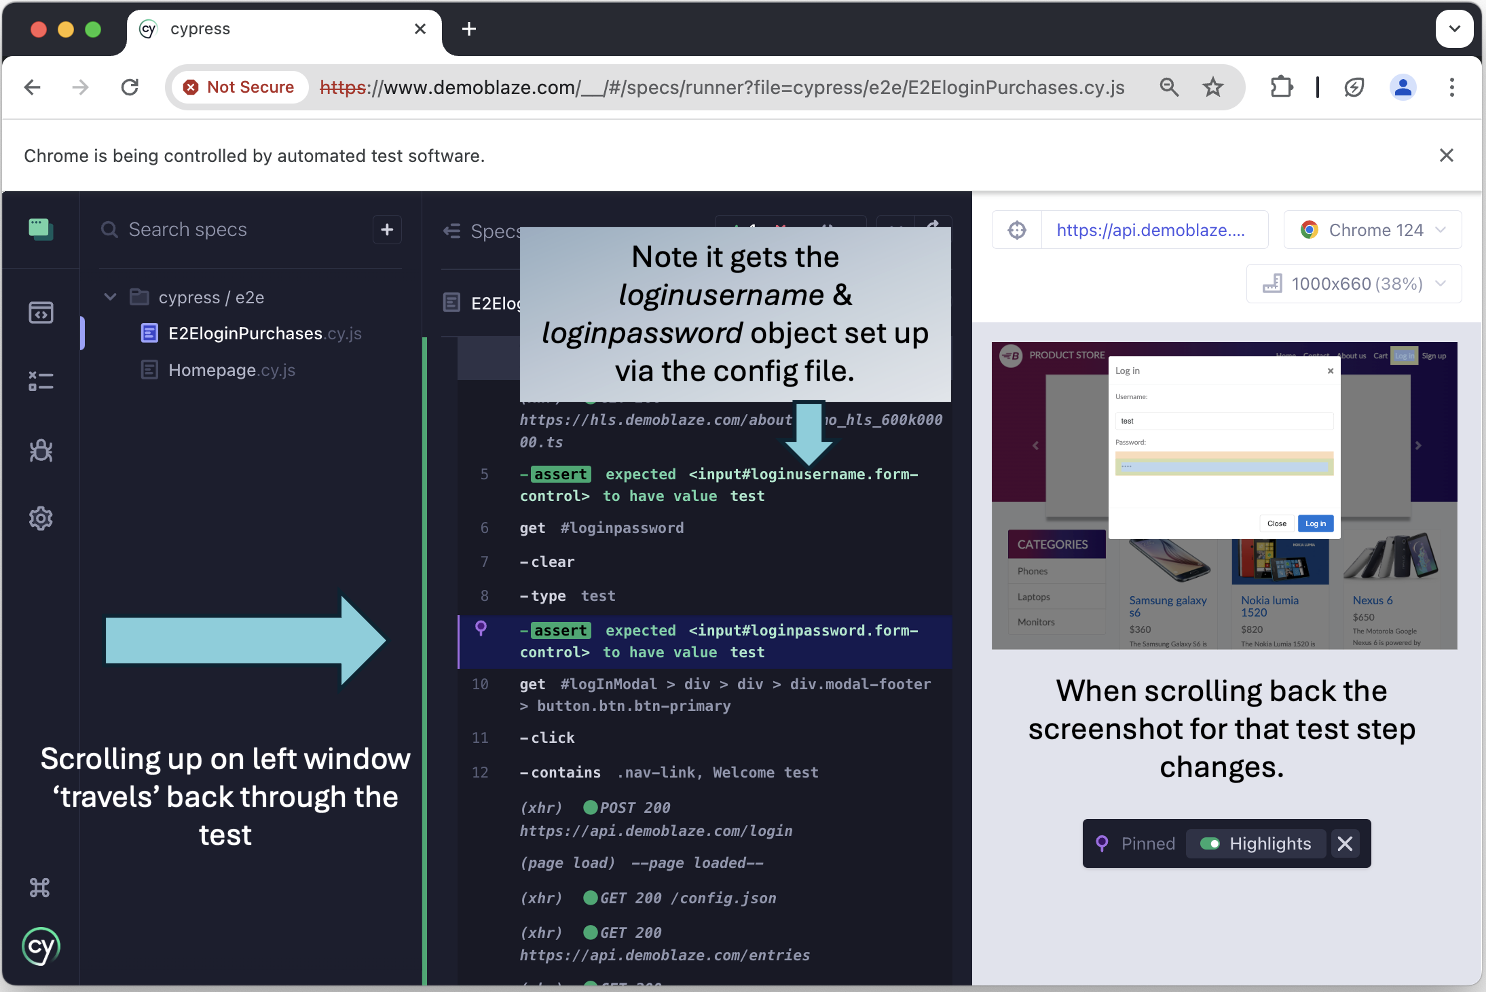
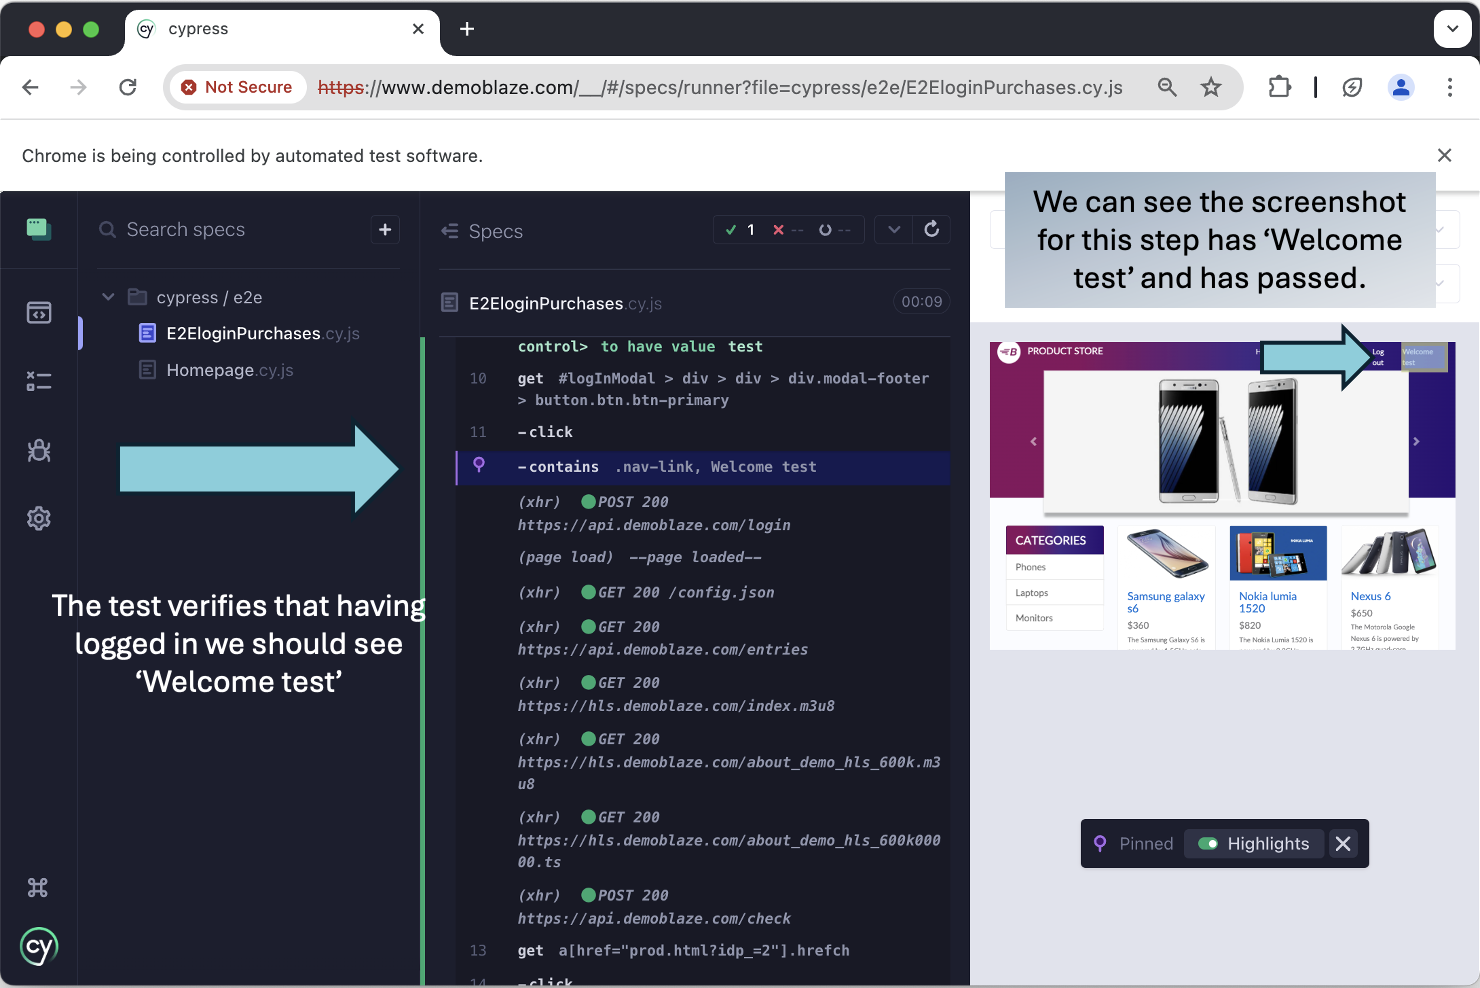
On the successful run, we can see the test step to verify a message appears on screen ‘Welcome
The advantage of time travel is that it makes it really convenient and efficient to check the variables we’re passing in, and how the system behaves. If we have a failing test, we can efficiently debug by ‘travelling’ to the steps in question. In the example below, the test step expects a different user name to what’s being passed on screen.
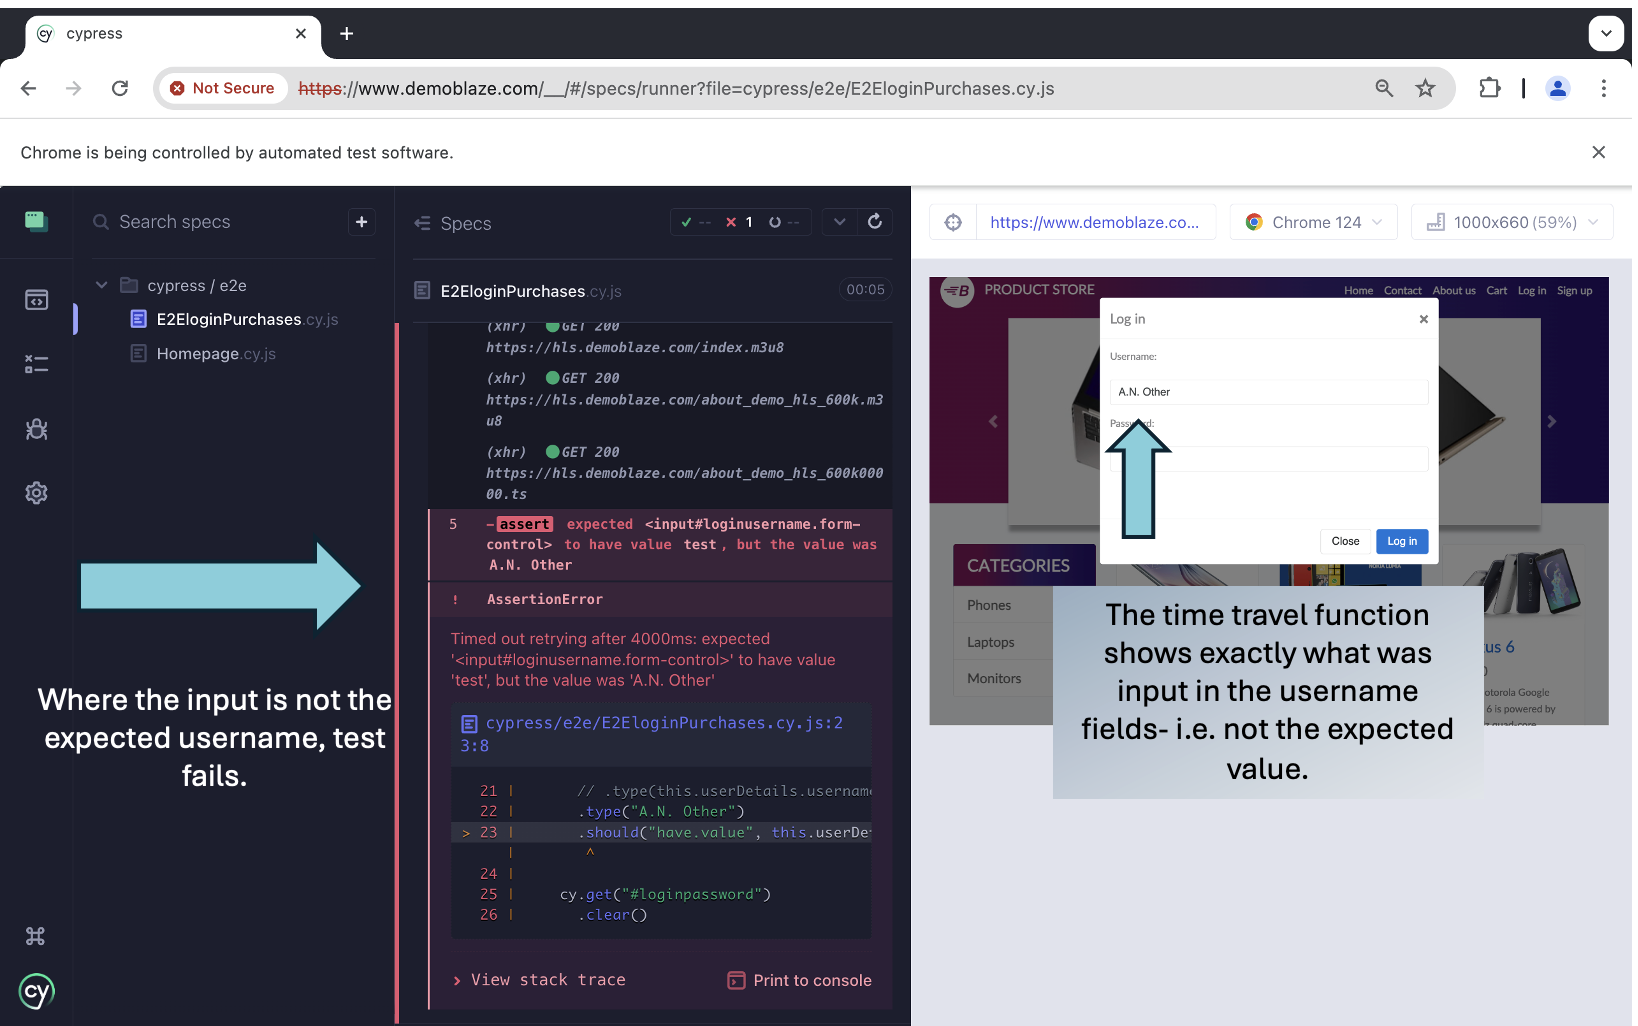
The failed step is identified and we can have a closer look at exactly what was happening at that point on the system under test.
Cypress - Summary
In summary, the Cypress documentation allows us to get up and running pretty quickly, and the example given of setting up the first test allows us to build up the test plan. In the post we had a quick look at setting a base url and test config, and I personally I was impressed with the [time travel feature]- {#cypress_page_locator}some of the page elements on the system under test were difficult to identify in javascript, the time travel showed the exact stage and screen where the issues were, which was invaluable when it came to debugging.
Set up Playwright and run tests
This is a rough guide to get up and running (follow the links for more detailed instruction) and we’ll use the same test plan as mentioned in Test Plan.
Installation
To install and configure Playwright, I used the following guide which got me up & running:
Automating End-to-End testing with Playwright and Azure Pipelines
I recommend setting up the folder structure using Visual Studio Code (see step 2 of the linked guide.) You’ll also need an NPM package installed as mentioned in the guide, this should be installed in step 6 by running:
npm init playwright@latestⓘ during installation step 6 ‘Execute Playwright Test Script’ would not work for me, my solution was to change directory (in command line/terminal) to my playwright project folder, then run: npm init playwright@latest
Run tests directly in Visual Studio Code
To run directly in VSC, you need to install playwright extension, as per: https://playwright.dev/docs/getting-started-vscode#installation.
Once installed you should see a green run icon in the test spec window:
![]()
Create tests
The initial set up of Playwright helpfully includes a file called tests/example.spec.ts, this gives us a solid example to explain how the tool works, and I used this to build up the test scope.
import { test, expect } from '@playwright/test';

test('has title', async ({ page }) => {
await page.goto('https://playwright.dev/');

// Expect a title "to contain" a substring.
await expect(page).toHaveTitle(/Playwright/);
});

test('get started link', async ({ page }) => {
await page.goto('https://playwright.dev/');

// Click the get started link.
await page.getByRole('link', { name: 'Get started' }).click();

// Expects page to have a heading with the name of Installation.
await expect(page.getByRole('heading', { name: 'Installation' })).toBeVisible();
});
To run tests, use the following command in either VSC or the command line/terminal.
npx playwright test --Playwright codegen
Playwright has an impressive feature to record script automatically called Codegen. In theory it can record the whole log in, add item to basket etc. steps for us, but I found it more useful to find those page elements which were awkward to find and use in Cypress. For example, if we run the following command, the specified website and Playwright inspector will load up.
npx playwright codegen browserstack.comWe can undertake our actions on the website, e.g. lets click log in, and input a user name and password. As you can see in the clip below, the user actions in the browser is tracked in the Playwright Inspector, so we can see the locators, tags and roles etc.
In my experience, it didn’t quite capture the whole test code I needed, but it definitely saved time in getting the right elements.
Browerstack has a useful summary here: www.browserstack.com/guide/playwright-debugging/
Authenticated log in state
Rather than have to repeat the log in steps explicitly for each test that requires a logged in user (e.g. adding items to cart and checking out), its possible to save the ‘logged in state’ to a setting in the .config.ts file:
storageState: "playwright/.auth/user.json"This object points at auth.setup (which is in the testDir location specified in the config). This file is effectively the successful log in test, and writes its logged in state back to the user.json file configured in playwright.config:
await page.context().storageState({ path: authFile });Now, by importing the Test class, the logged in state is used, i.e. each test which imports this class is in a logged state as a begin action.
If you want to see this applied, see the auth.setup file in playwright/tests, and the user.json in playwright/playwright/.auth, or checkout this helpful write up: https://www.cuketest.com/playwright/docs/auth/
Traceviewer
Traceviewer allows us to review a record of completed tests, similar in a way to Cypress Time travel (which we looked at previously), it reports the test result and allows us to check the outcome of each test step. The benefits here are for reporting itself, and when necessary for debugging, we can review a failed test and see exactly where/why it failed the given test step.
To enable traceviewer, we need the following value in the config file.
/_ Collect trace when retrying the failed test. See https://playwright.dev/docs/trace-viewer _/
trace: "on-first-retry
Lets demonstrate how to use traceviewer by change one of our passing tests so it fails. In login.steps , the log in message when logging in is ‘Welcome test’ (test being the username), so lets change the expected value in the test to ‘Welcome visitor’:
test.describe("Log in tests", () => {
test("Successful log", async ({ page }) => {
const loginPage = new login(page);
await loginPage.initializeLocators();
await loginPage.loginFunction("test", "test");
await expect(
page.getByRole("link", { name: "Welcome visitor" })
).toBeVisible();
To run traceviewer, go to the command line/terminal and input:
npx playwright test login.spec.ts:10 --trace onThis runs traceviewer for the specified test.
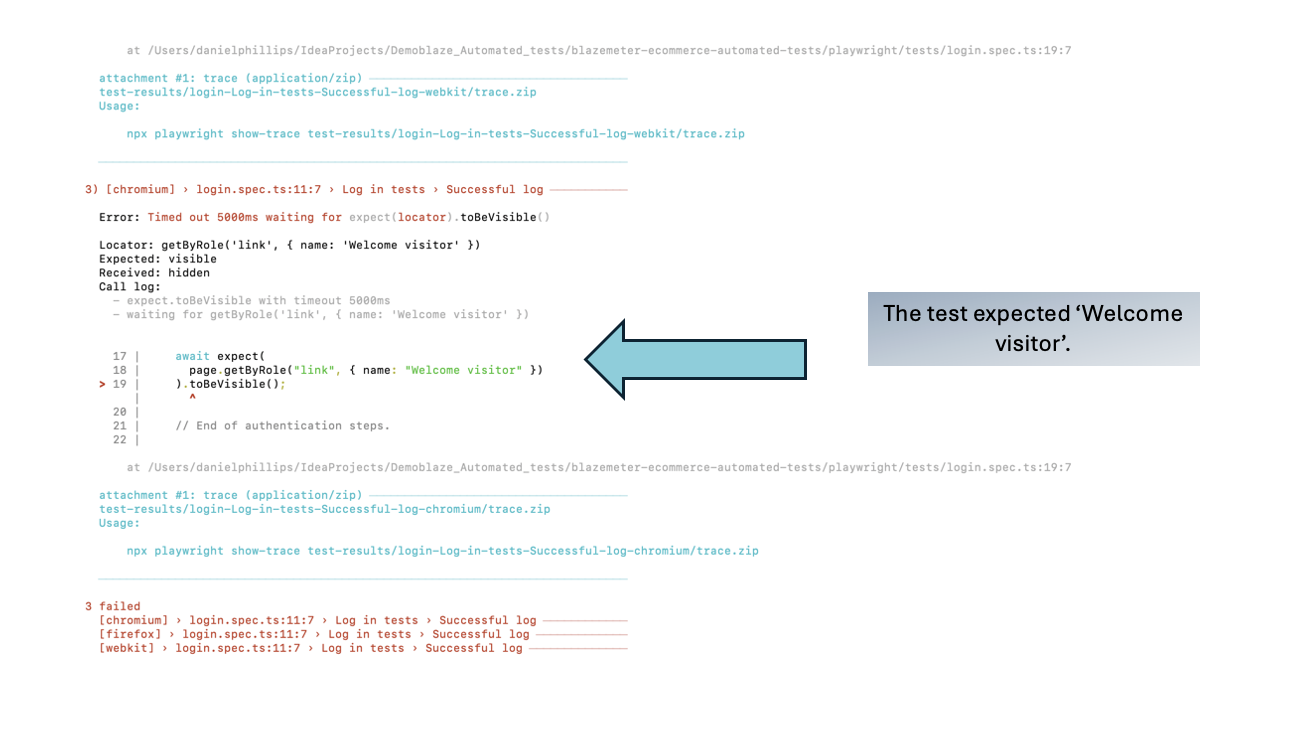
Traceviewer saves the test run in a zip file, you can also view it in the browser, for example:
Serving HTML report at http://localhost:57023. Press Ctrl+C to quit.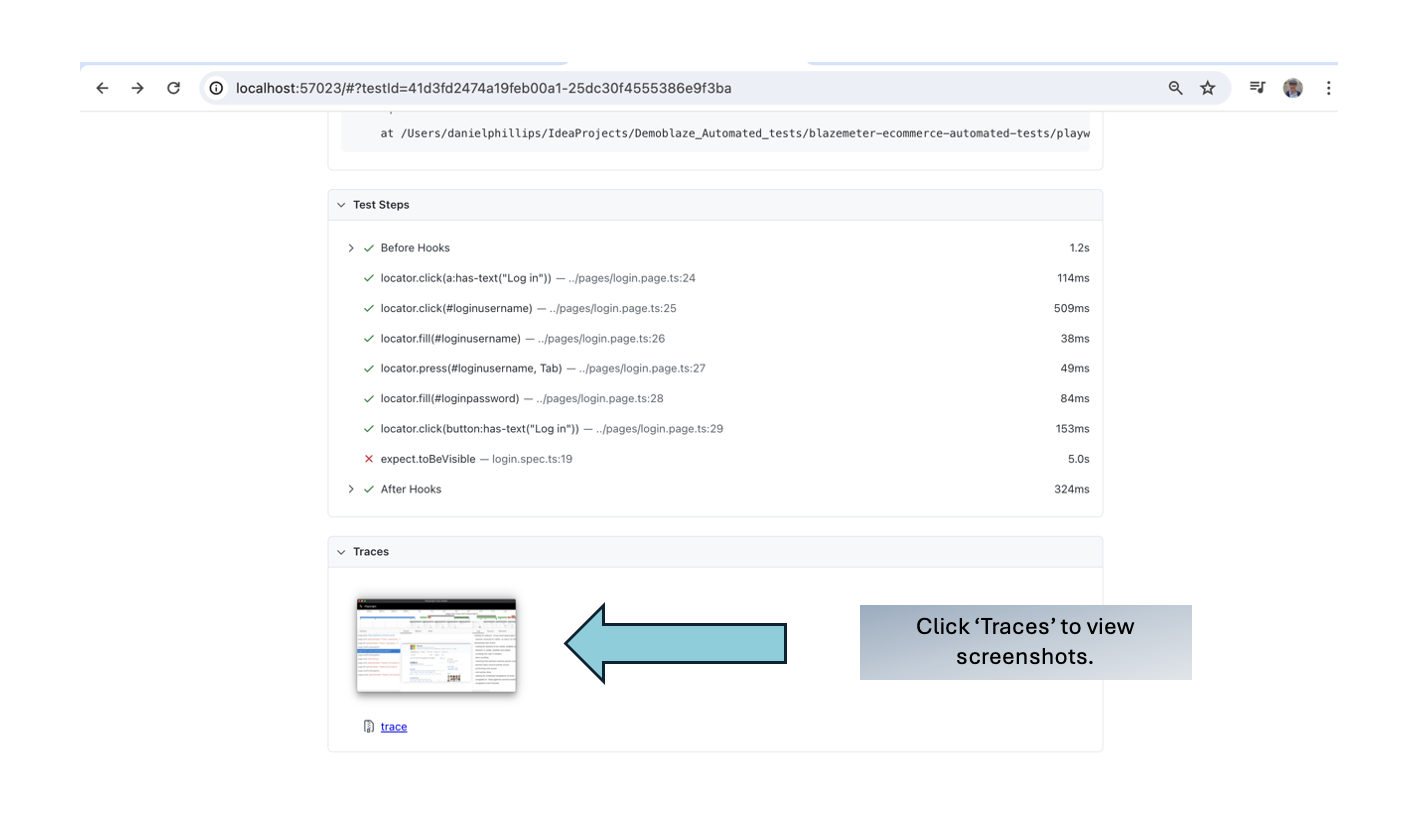
The test report shows us the failing test, and clicking trace allows us to see screenshots of each test step. We can see that the message on screen is ‘Welcome test’ not ‘Welcome visitor’.
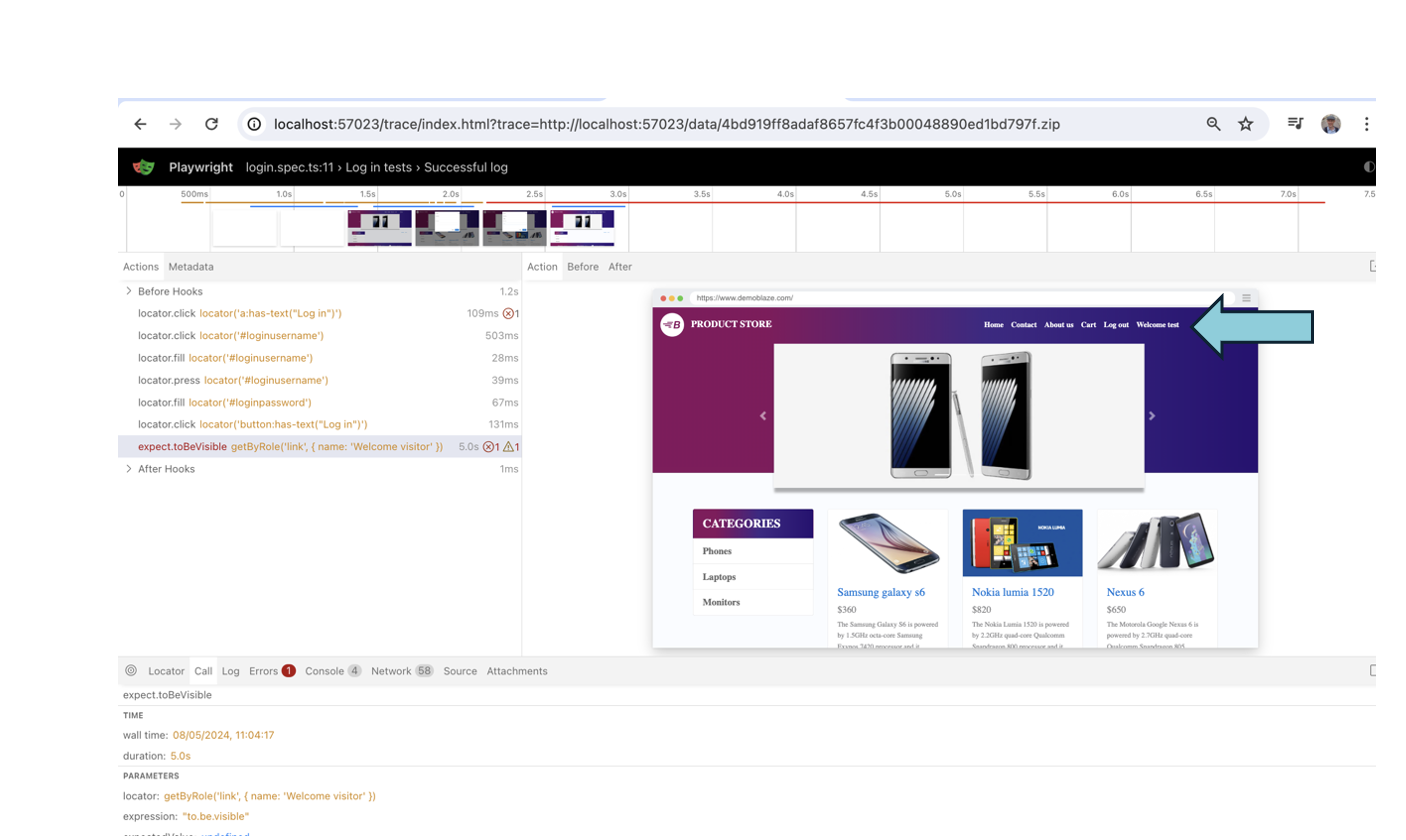
This is a really good explanation and summary of Traceviewer, from the official Playwright channel:
Summary - Playwright
I found Playwright relatively straightforward to get up and running quickly, and am impressed by the utility and intuitiveness of codegen and traceviewer. We used a simple example above for traceviewer but it definitely enables quick and effective reporting and debugging, and the codegen tool did help in finding the more awkward page elements which took more time in Cypress.
Cypress versus Playwright (and Selenium)
This is a summary of what we’ve seen in this exercise, and compares to a tool I am more familiar with, Selenium.
Both Cypress and Playwright are marketed as more ‘modern’ to use than the older Selenium, and this exercise has demonstrated to me that both Cypress & Playwright are more ‘lightweight’ to install, intuitive to use and quicker to get up and running and getting good UI test coverage efficiently. Cypress documentation states it should ideally be used when building a web application, and I can see how its user friendliness would enable devs/testers to efficiently undertake good test driven design.
The debugging and selection tools mentioned in this exercise were a big help, and well designed in my opinion. The impressive built in reporting tool (Traceviewer) in Playwright is something Selenium lacks (at least without a plug in).
However, there are some points to consider when we compare to what is still the mostly widely used alternative, Selenium. Both Cypress and Playwright can be described as ‘opinionated’ i.e. they are designed in a specific way to work efficiently but therefore have constraints on how they are used. For example, both tools have implicit waits (i.e. a test step waits for an element to load). This is at first a glance an advantage, it allows the page to load and the test to proceed. However, it may mask a performance issue, perhaps the delay in loading is not acceptable for the users. Selenium does not have this implicit wait, you can add one to a test but its not the default.
While the ease of use can appear to be an advantage, perhaps Selenium’s flexibility in being able to integrate other third party tools and plug ins means it remains more adaptable, and can be used in a broader range of projects.
Given the age of Selenium, which has been around substantially longer than the other tools, it has a wealth of support and knowledge available online, the others are building that legacy too but you will generally find someone has had the same issue you have in Selenium!
To wrap up, I would recommend anyone weighing up the pros and cons of Cypress versus Playwright (and of course Selenium) to try out the tools as demonstrated in this blog. I found it invaluable to see for myself how Cypress and Playwright really do offer something different, and perhaps more ‘modern’, but its interesting to note I use Selenium on my day to day work.
ⓘIn future I will add a 3rd project to my github repo to cover off the test plan for Selenium webdriver.